How to Start a WordPress Blog on Bluehost -No Coding Skills 2025
How to Start a WordPress Blog on Bluehost -No Coding Skills 2025
Thinking about starting a blog but don’t know where to start?
You’re in the right place! In this post, we’ll show you how to start a WordPress blog on Bluehost in 7 simple steps.
Even if you have zero coding skills and zero blogging experience.
Once your blog is ready, you can start publishing killer-ass content and build an online audience.
And once you have an audience, you can start making money from your blog. It’s a great way to share your thoughts and ideas with the world – and make some money while you’re at it.
So follow these steps to get your WordPress blog on Bluehost today!
Because if you are a rookie blogger, you will learn how to start a blog with Bluehost, how to get a FREE domain name, and how to publish your first of many epic posts.
(Real quick. If you want to know how to start a movie blog or even know how to start a knitting blog, this step-by-step guide. Will. Show. You. How.)
But first, before I reveal the steps on how to start a blog on Bluehost.
Why Bluehost Is The Best For Blogs?

This page have some affiliate links. In other words, if you buy from my links, I may get a commission.
Bluehost is a great platform for beginners looking to create a website, whether you’re a blogger or an entrepreneur getting started.
They have great customer support and an easy-to-use control panel. This makes it easy for you to get your website up and running in no time.
Other notable features of Bluehost website builder:
- A free domain name for the first 12 months.
- Their hosting plans are inexpensive. For less than $3 a month.
- It’s free and super easy to start a WordPress blog on Bluehost.
- No silly hidden fees.
- WordPress even recommends using WordPress with Bluehost blog.
- Create free custom email addresses with your domain names like [email protected]
- Friendly 24/7 support.
- Free SSL certificate.
- 30-day money-back guarantee. This means if within 30 days you are not happy with Bluehost, you can ask for a refund on the hosting plan (minus the domain registration fee).
Over the many years of blogging, I have tried a few hosting providers and Bluehost stands out with its easy and quick setup.
On that note.
If you plan to use Bluehost with WordPress and you want to know how to start a blog with Bluehost, let’s continue to geek out.
How much does it cost to start a blog on Bluehost?
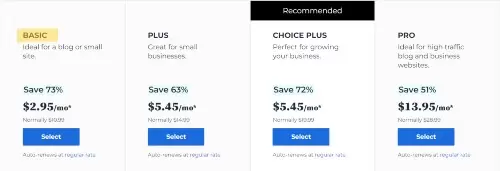
There are four plans available from Bluehost.
- BASIC – $1.99/month*
- CHOICE PLUS – $3.99/month*
- ONLINE STORE – $7.45/month*
- PRO – $9.99/month*
Note that, all plans above include a FREE Domain (1 year), FREE CDN, and FREE SSL Certificate.

The bottom line – Bluehost is one reliable blog host. They offer great customer support and super easy WordPress Installation. Plus, their plans are inexpensive.
Just look at it this way. For $1.99 a month, which is like having one cup of black coffee a month, you can have a blog up in no time.
Interested? All you need to do is sign up for a BASIC plan here, and you’ll have your Bluehost blog running.
In a nutshell. This is essentially how to start a WordPress blog with Bluehost.
With that out of the way, let’s go through the steps on how to use Bluehost with WordPress in more detail.
What Do I Need to Start a WordPress Blog?
If you’re not too sure what these things are, I’ve got you covered. So scroll on down.
1. What is blog hosting?

Image courtesy of Pexels
For those who are new to blogging, blog hosting is a great way to get your blog online and visible to the world.
It allows you to create and manage a blog easily, without having to worry about complicated technical details.
Basically, blog hosting is like renting space on an existing server so that you don’t have to manage one yourself.
Think of it as renting a room in someone else’s apartment.
You’re not buying or maintaining the property, but using the services it provides while living there.
To give blog hosting a real-life example, let’s say you’re interested in starting a WordPress blog about interior design.
With blog hosting, you can use a provider (I recommend Bluehost) who will give you the space and resources needed to kickstart your blog and make sure it runs smoothly.
In other words, a hosting provider acts as the landlord of your virtual space.
What to look for in a web hosting provider?
As a blogger, I want reliability and a fast-loading website.
As a website visitor, I want a website that loads fast and gives me what I want.
When looking for a reliable blog hosting provider, there are certain features and services to keep in mind.
Firstly, look for a host with good uptime and fast loading speeds.
Fast loading speeds are essential for a successful blog.
So, if your website loads slowly, it cannot only turn away potential visitors and customers but also negatively affect how high you appear in search engine rankings.
Search engines like Google prioritize websites that load quickly and efficiently, as this is an indicator of how trustworthy the website’s content is.
You also want to make sure the hosting plan you choose includes features like automated backups, secure encryption, and more.
All these features provide an extra layer of security for your blog, so it’s important to consider how reliable the host is before making a decision.
As well, a reliable host should offer high-quality hardware and servers to ensure your blog is always available and accessible to visitors.
Secondly, the hosting company should offer easy installation of popular blogging platforms, such as WordPress.
Finally, look for a host that offers plenty of customer support and helpful tutorials on how to get the most out of your blog.
I’ll put my hand up again and say.
I recommend Bluehost for blogging beginners because it is reliable, provides fast loading speed, and is affordable.
2. What is a domain name?
A domain name is how your blog will be found on the internet.
It’s like an address for your website – when someone types in your domain, they will be taken to your blog.
To put it simply, if you were renting a room in an apartment, you’ll have a residential address where people can find you.
So choose a domain name that reflects the content of your blog, and your brand and is easy to remember.
3. What is WordPress?

Image courtesy of Pexels
Fun fact: according to W3Techs, WordPress is the most preferred CMS used by 63.6% of websites surveyed. This is huge.
WordPress is a content management system (CMS) specifically designed for blogging.
Once you have blog hosting and a domain name, you can install WordPress on your Bluehost account with just one click.
From there, you’ll be able to customize your blog and begin writing posts to help your readers.
Now that you know what you need to get started, it’s time to start your blog on Bluehost!
If you’re ready to start. Let’s get onto the 7 easy steps on how to start a WordPress blog on Bluehost.
Bluehost WordPress Tutorial: How to Start a Blog on Bluehost

Image courtesy of Pexels
This Bluehost WordPress tutorial is a big read, but I tried to keep it simple. I swear it is.
So, if you seriously want to know how to install WordPress on Bluehost, then stick around.
(I’m assuming here, you’ve dialed in on your money-making topic and have lasered in on your ideal audience. For more on this check out this post on starting a blog checklist.)
1. Choose a Bluehost Plan.
The first step is to choose the right plan for your needs and budget here.
Then click on the ‘View Plans‘ button.
Bluehost offers four different plans – Basic, Choice Plus, Online Store and Pro – each of which comes with different features and pricing.
If you’re just starting and don’t have a lot of traffic yet, the basic plan is the best choice.
It comes with 10GB of storage space so it should be sufficient to get your blog off the ground.
Here’s a secret. I’m tight with my expenses, so I like to start small.
As you can guess.
The basic plan was my obvious choice for a new blog because it had zero traffic at the time and it had the tools I needed to start my Bluehost blogging business.
And the nice thing was.
If the blog didn’t work out, it was a small loss in terms of money.
But, if the blog started generating traffic, I had the option to level up my hosting plan with Bluehost.
Although I had to pay for the web hosting to get my blog up and running, I saw it as an investment to build a Bluehost blog that could potentially make my money back and more.
Blogging after all is not a hobby. It’s a business.
2. Got a name?
Once you’ve chosen a plan, the next step is to register your domain name.
You can either choose an existing domain name or create a new one with Bluehost.
At this point here, I suggest having at least 3 domain names on hand as there may be a chance that your first preference may be taken.
If you don’t have a domain name, you can skip this step by clicking “I’ll create my domain later”.
If you have your ideal domain name for your Bluehost WordPress blog, then registering it is free and effortless – just go to “Create a new domain”:
Then type the domain name in the box and click “Next“.
If it isn’t available, try another domain name – or you have the choice to decide later when you have your hosting set up.
To do that, click on “I’ll create my domain later”.
If you remain on the page or hover your mouse near the top, a popup will appear with an option to click “Choose Free Domain Later”.
Once you’ve chosen a domain name or decided to do so later, the final step in your signup is to set up hosting for your WordPress blog.
3. Let’s play.
Here. The fun part begins.
And don’t worry. It’s straightforward.
To set up Bluehost hosting for a blog, first fill in your account information.
Use an email address you check often because this is how you’ll get the login details.
Second, pick how long you want the hosting plan to last. I suggest going for the cheapest plan, the Basic plan because it is all you need for a new Bluehost blog.
For rookie bloggers, I recommend the 12-month plan as it is a great starting point for beginners and super affordable.
Ok. That being said, once you’ve picked a plan, you’ll be taken to this page to register a domain for your Bluehost blog.
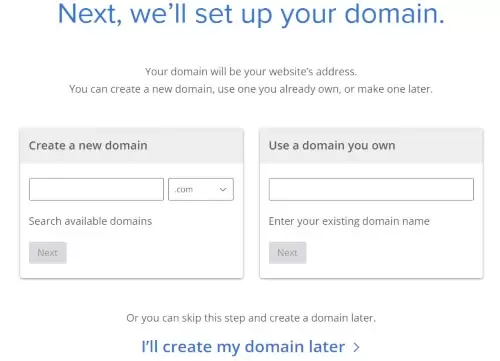
If you have picked a domain name, then ‘Create a new domain’.
If you don’t have one, then click on ‘I’ll create my domain later’.
And then fill in the rest below.
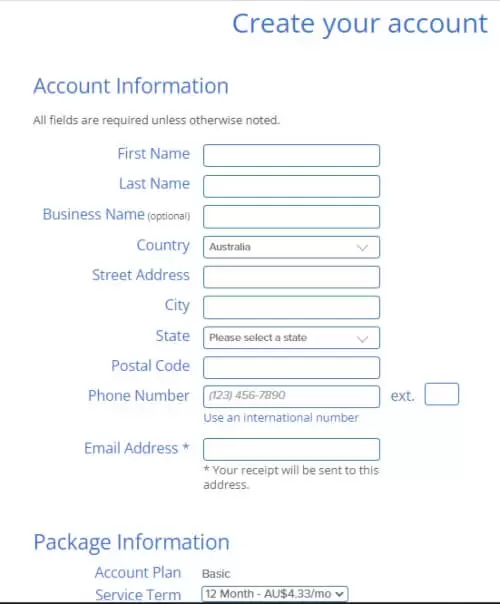
Note here that when you register for 12 months or longer, you’ll get a free domain name. More savings!
Moving on. Once you’ve entered all the details, the next step is this.
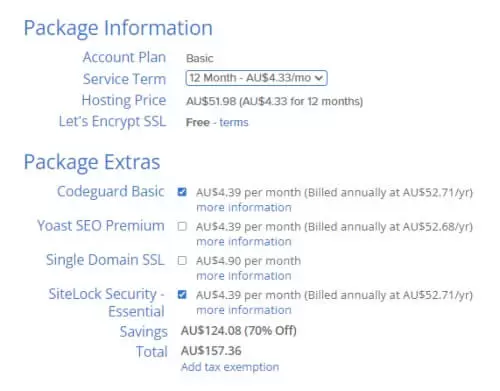
Thirdly, choose any extra services if you think they are helpful. But, don’t buy something you’re not sure what it is for.
However, I suggest skipping those ‘extras‘. That’s just my two cents.
But, I’ll leave that decision to you.
For more details on those ‘Package Extras‘, click on ‘More Information‘.
Finally, enter your payment details and follow the instructions to complete the launch your Bluehost website builder.
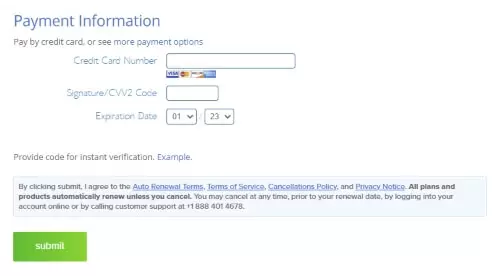
And when you have, this pops up.
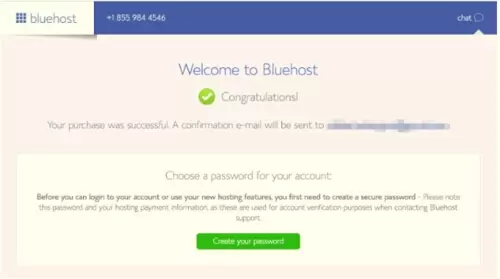
Now onto the next step on how to build a WordPress website with Bluehost.
4. Drum roll.
This is the easiest and the most exciting part. Installing WordPress on your hosting account.
Once your payment has been processed, you should receive a welcome message from Bluehost.
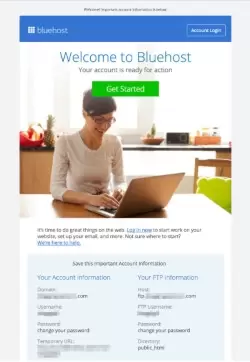
First, create your password and make it a complicated one.
And you’re done. You now have a Bluehost WordPress blog ready to be unleashed.
5. Get your look.
Once WordPress is installed, it’s time to customize how your blog looks. You can do this by choosing a free theme from the library of available options or creating one of your own.
However, do note that the free themes on offer are less customizable. So, if you want a more flexible theme, a paid theme is the best option.
A paid theme that I use and recommend is Elegant themes. It’s customizable and easy to use, and there are many awesome responsive themes you can choose from.
Now, if you are unsure which theme to go with, you can always skip this step and come back to it later.
You can also add plugins to your blog to add features like contact forms, cache, and more. (More on this later in the post.)
There you have it. You now have a Bluehost WordPress blog ready to go.
Now, that’s how to start a WordPress blog on Bluehost!
Moving on.
6. Time for the inner sanctum.

Image courtesy of Pexels
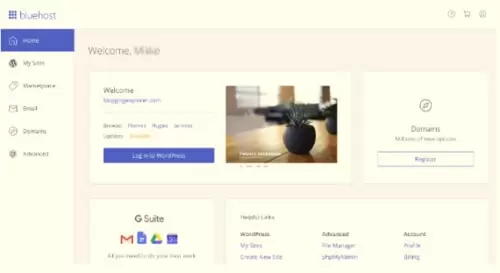
Once you have chosen a theme (or decided to skip it for later), you’re directed to your Bluehost account dashboard.
In the dashboard, you have control over your websites, domains, plugins, and other settings.
In fact, in the center of your dashboard, you’ll be able to see your WordPress blog.
To access your Bluehost WordPress blog, click the button – “Login to WordPress”.
And that’s it. You’ve more or less have all the technical Bluehost WordPress Blog stuff done and dusted.
I hope you’re excited because here is where you can do all kinds of things to fancy up your blog, and more importantly, load your blog with useful content.
Another naughty secret. I’m lazy when it comes to fancy logos and colors. You can say that I’m simple.
And I like to keep it simple because I prefer to get on with creating epic content and generating traffic to it.
The bottom line in all this is.
Don’t get too carried away with all the fancy stuff because it can be a huge time suck. You can always fancy up your Bluehost WordPress blog later.
Ok?
If you want to know how to start a blog on Bluehost successfully, you need to be planning and creating useful content consistently so you can connect with your readers and then turn the traffic into sales.
Now, back to this part of the Bluehost WordPress tutorial.
When you log into your WordPress dashboard, you’ll be prompted to set up your blog. You will need to provide your website’s name, description, and a few other details.
A quick mention.

Image courtesy of Pexels
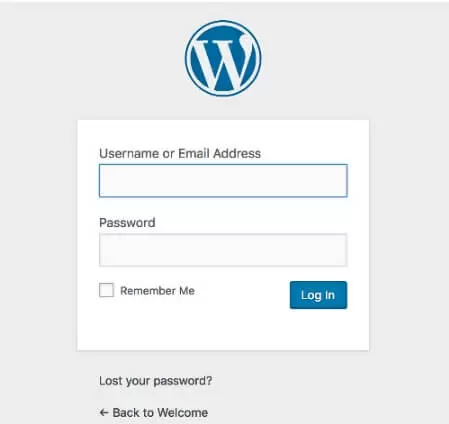
Another way to log in is to enter your domain name followed by “/wp-admin” into any web browser. Then type in your username and password which you will find in an email from Bluehost. Once you are logged in,
For example, if your domain is “myurl.com”, enter this URL – https://myurl.com/wp-admin.
Then hit your Enter button, where you’ll be directed to your login page.
To access the dashboard, enter your username and password details to log in.
Again. Don’t fret if you can’t recall the WordPress blog username and password because you will have received an email from Bluehost about your login credentials to get started.
Moving on.
When you log in to the admin area of your dashboard, you can start customizing your blog, creating posts, and pages, or adding media like images and videos.
But before you do, you’ll notice the WordPress admin area has a menu on the left side with key features.
You can use it to write posts, upload photos, and videos, make pages like Contact or About Me page, view comments from readers, and change how your website looks.
Some plugins help you add new features like contact forms and security tools.

Here’s a quick breakdown.
- Posts: Here you can draft, polish, read, and oversee your blog posts.
- Media: You can upload and organize your images and videos that can be used in your blog posts or web pages.
- Pages: Design and personalize your pages like a Contact or About Me page to reflect who you are!
- Comments: Encourage an engaging dialogue on your blog by viewing, approving, and managing feedback from readers!
- Appearance: Easily customize the appearance of your Bluehost WordPress blog by searching for, installing, and configuring new WordPress themes. I recommend Elegant Themes.
- Plugins: Plugins can bring a wide array of fresh features to your blog, including contact forms, SEO-enhancing tools, and security and backup options – among many other useful additions! (More on this next).
About WordPress Plugins
WordPress plugins are powerful additions that you can quickly and easily install onto your WordPress dashboard, giving it a whole new set of features to enhance the user experience.
Before you begin enhancing your WordPress website with plugins, there are a few things to consider.
For example, having too many plugins can slow down your site and frustrate your readers.
Therefore, it’s important to maintain the number of plugins you use at a minimum for optimal performance.
Additionally, keep in mind that anyone can develop and publish a plugin to the WordPress library.
This means the quality will vary.
While some plugins have been designed by large cohorts of experienced coders, others are the work of lone hobbyists.
Hence, if you are new to WordPress, it is wise to pay close attention to the rankings and reviews for any plugin that you plan on using.
For my best picks, you can read this blog post using the best WordPress plugins for your Bluehost blogging.
Four more things to pay attention to.

1. For optimal performance, limit yourself to the necessary plugins.
Bloggers are often tempted to install plugins since they’re so straightforward, even if it is just for the sake of having them. Avoid this mistake.
2. Keep your plugins tidy and organized by regularly performing maintenance checks.
Once a month, go through your list of installed plugins. Remove any plugins you do not need.
3. Keeping your plugins up-to-date is essential for protecting your website – make sure to check them weekly.
4. Don’t take any risks – safeguard your website by backing up all of its data before you update. Plugin updates may sometimes spell trouble for your blog, so be mindful when making changes.
To ensure your website is protected before making any changes, use a free plugin such as UpdraftPlus for hassle-free backup creation.
Doing so will provide you with peace of mind knowing that all the data from your WordPress website has been securely saved and stored.
How to search and install WordPress plugins

In your WordPress dashboard, you can explore and install plugins with ease. Searching for the ideal plugin has never been simpler! Navigate to Plugins > Add New to get cracking.
Using the WordPress Plugin Directory, you can easily find a particular plugin by typing in a keyword.
To install any plugin you wish, simply type its name into the search field on the right.
Once you’ve located the plugin of your choice, click on “Install Now” to install it promptly. While the plugin is being installed, do not leave the page.
After the installation process is complete, click on “Activate” to unlock all of the features that your plugin has to offer!
Side note: Do not enable auto-updates for your plugins and think twice before updating them right away. Now and again, new plugin updates bring along some pesky bugs, which are typically resolved within a few weeks.
To manage all the plugins on your WordPress blog, simply go to Plugins > Installed Plugins in the left-hand side menu. It’s that easy!
And that’s how you create a WordPress blog on Bluehost!
As you can see, setting up a blog is easy and doesn’t take very long. You can now start writing your best posts and sharing them with your readers, which I’ll cover next.
So let’s move on to the last step.
7. It’s showtime.

Now that you have set up a WordPress blog on Bluehost, it’s time to crank out your first post.
And as it is your first post, just keep it short and sweet. There’s no need for a post to be long or complicated.
As a newbie blogger, why not kick off your journey by introducing yourself to the world? Let’s hear it – who are you and what do you have to share with your readers?
Sharing why you started this blogging journey, as well as what you hope to accomplish with it, will help readers understand the focus of the content — making for an effective opening article!
Just be you and allows readers into your world.
How to start a blog post on Bluehost
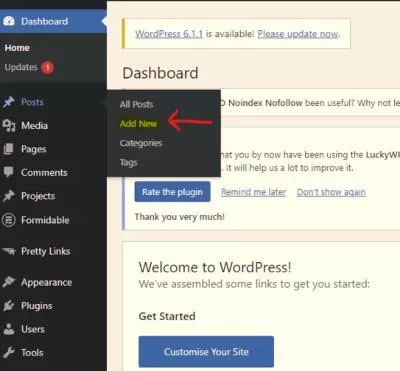
1. To write a blog post, open the WordPress admin area and click on “Posts” in the left-hand menu. From there select “Add New” to open up the post editor.
By the way, before you start blogging away, be sure to check the best practices for blogging here.
2. The headline of your blog post is the H1, or chief heading, for your entire article. Make sure you create an attention-grabbing title so that readers want to dive in and learn more! In other words, your blog post title is the most important heading.
3. You can then write your post in the text editor. Just type in the field or paste content from another source – like a Word document, Google Doc, etc.
4. Keep in mind to shorten your sentences and paragraphs so that it is both easy to read and engaging.
5. Add Headings (H2, H3, H4) within your body text as they help separate text into more manageable chunks. Headings can be used strategically to create a sense of structure within your blog post.
6. Tip: If you want to emphasize the importance of multiple sections on your website, consider utilizing H2 elements.
This will help ensure that each section is given equal attention and visibility. And, if you want to organize your H2 blocks further, employing H3 and H4 headings can be incredibly helpful in segmenting and breaking up large chunks of text.
7. Style your paragraphs and test using bold (B) and italics (I) to emphasize a word or sentence.
8. To add images and other media to your posts, click on the “Add Media” button at the top of the post editor to select and upload files. I recommend adding at least 3 to 5 images to break up the text.
9. Label your images using keywords. To do this, right-click on the image and then enter your keywords into the image file. For example, instead of “213445456.jpg”, change it using a keyword, like “how to start a WordPress Blog on Bluehost.jpg“.
10. Don’t be afraid to experiment with the various formatting tools available; even if something doesn’t go as planned, it’s okay! Because you have the freedom to customize your content by either adding or deleting text blocks as needed.
11. To keep your readers engaged longer on your website, add internal links to your blog post.
12. Give your readers a valuable resource by including external links in your blog posts.
By drawing attention to high-quality websites, you’re building credibility while providing helpful information!
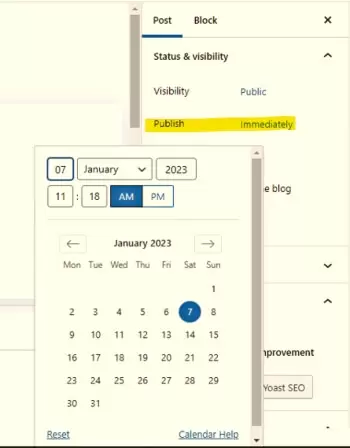
When you’re finished writing your first blog post, click on “Publish” at the top right of the post editor.
But if you prefer a post to be published later, you can schedule it by clicking on Immediately and then selecting a date and time.
And that completes our Bluehost WordPress tutorial! You’ve now learned how to start a WordPress blog on Bluehost in 7 steps.
With the tools and resources provided, blogging is now within your reach.
So, go ahead and get creative – the sky’s the limit! And happy blogging!
How to Start a WordPress blog on Bluehost – FAQ
Is Bluehost good for blogging?
Fortunately, Bluehost is the perfect place for beginner bloggers. It provides an easy-to-use interface that simplifies setting up your blog, as well as an intuitive signup process.
Plus, if you’re just getting started in the blogging world, you’ll be pleased to know that you’ll receive a free domain name for your first 12 months – giving you great value at an unbeatable price.
And to top it off, Bluehost is recommended by WordPress themselves – the most popular blogging software used worldwide!
So if you’re on the hunt for a blog hosting provider to start your blog, Bluehost should be on your radar.
Is Bluehost good for beginners?

If you’re a blogging beginner, look no further than Bluehost for the best start to your website.
They make it incredibly easy and fast to launch a fully-functioning blog with WordPress, so all the basics you need are set up with minimal fuss.
And they can do it on a budget too – their plans start at just $2.95 per month.
Not only that, but they have 24/7 live chat support on hand if you run into trouble, and they even throw in a free domain name for the first year and a free SSL certificate!
It doesn’t get much better than this when it comes to setting up your website.
Psst. If you want to know how to build a WordPress website with Bluehost, continue reading.
How to use Bluehost with WordPress?
Seriously. Starting a WordPress blog on Bluehost is quite simple.
All you need is the domain name of your choice and a few clicks away, you’ll have a Bluehost blogging business!
This is how to use Bluehost and WordPress in 5 steps.
1. Choose Your Domain Name:
The first step in creating your WordPress blog is to choose a domain name.
A domain name is how people will find and access your website, so you must pick one that you like and that is easy to remember.
2. Choose Your Hosting Plan: Once you have chosen a domain name, the next step is to choose a hosting plan.
Bluehost has a variety of hosting plans to choose from, so you can select the one that best fits your needs and budget.
And remember, when you sign up with Bluehost, you’ll get a FREE Domain (for 1 year), FREE CDN, and a FREE SSL Certificate.
3. Install WordPress: Now that you have chosen a domain name and hosting plan, it’s time to install WordPress on your server.
Installing WordPress is easy with Bluehost. All you have to do is click a few buttons and you’ll be ready to go in no time.
4. Design Your Blog: The next step is to design your blog. With WordPress, you can choose from thousands of different themes and plugins that allow you to customize your blog the way you want it.
You can also add widgets and other features to make your blog truly unique.
If you’re considering a premium template, I recommend Elegant themes.
5. Start Blogging: Once you have designed your blog, it’s time to start blogging! Write about topics that will be helpful for your readers, post pictures and videos, and interact with your readers. There are endless possibilities for how you can use your WordPress blog on Bluehost.
And that’s how to start a blog with Bluehost and WordPress.
How does Bluehost work with WordPress?
First, it provides an intuitive dashboard that makes setting up your WordPress blog quick and easy. Plus, when you sign up for Bluehost, you’ll get a free domain name for the first 12 months!
In addition to this, Bluehost also provides an optimized hosting environment for WordPress websites only. This means that your blog will run more smoothly and with fewer technical issues.
Finally, Bluehost also provides a free SSL certificate for your blog. An SSL certificate is important for establishing trust with your users, and it’s something that many other hosting providers don’t offer.
So if you’re looking for an easy way to start a WordPress blog on Bluehost, be sure to check out all the features they have to offer.
With their powerful hosting environment and easy-to-use dashboard, it makes setting up your website quick and simple!
How much does Bluehost cost per year?
For other Bluehost plans, click on the button below.
How to start a WordPress blog on Bluehost in 2025 – Summary
Using Bluehost with WordPress is an easy and affordable process to get your website up and running.
It’s the perfect choice for blogging beginners, as the plans start at just $2.95 per month and include a free domain name for your first 12 months, as well as 24/7 live chat support.
Bluehost also makes it incredibly easy to install WordPress, with just a few clicks of your mouse.
Once you have chosen your domain name and hosting plan, simply follow the steps outlined in this article to design and customize your blog with themes and plugins before you can start blogging!
And remember, when you post, put your audience first and post the best ever content you can.
With Bluehost, anyone can get started on their own website journey.
Now that you know how to start a WordPress blog on Bluehost, start here now and give it your all to make it work.
While you’re here.
If you have any feedback and thoughts about this long Bluehost WordPress tutorial, I’d love to hear them. And if there is anything you need help with, let me know.
One more thing. Please feel free to share this post ‘How to Start a WordPress Blog on Bluehost’ with others who may find this post useful! Thanks!
Disclosure: This post may contain affiliate links, which means I’ll receive a commission if you purchase through my links, at no extra cost to you. Please read full disclosure for more information.
You Might Want to Check This Out Too
Want to drive red hot leads to your blog? – 11 easy ways to promote your blog without the need for social.
Resources To Grow Your Business With
Bluehost
Bluehost is a great starting point for beginners or bloggers who want to switch to a reliable web hosting service. And it gives you the best bang for your buck - starting at $2.95 a month*.
With the entry-level hosting plan, you'll get a high up-time, reliable customer support, FREE domain name (first year) and 30 day money back guarantee.
You can sign up with Bluehost here.
WPX Hosting
It's a web-hosting service I love using. It specializes in WordPress hosting, and depending on what package you opt for, you can host 5 or more sites on one account. The best bit is - the quick turnaround in support is top notch.
For bloggers who have an established blog, this is a fantastic option.
You can learn more about this service here.
Aweber
Building an email list of a growing audience is essential for the longevity of any business. This autoresponder service is easy to use, and it is a great starting point for someone looking to kickstart their email campaign.

Hi, I’m Jason Ou (surname aka, Oh). I am a Solopreneur and Blogger. My mission is to help fellow entrepreneurs (like you) to profit from their passion online. Let’s connect on Facebook now.
