It’s easier than you think.
In this post, I’ll walk you through the steps on how to start a photography blog.
You’ll also learn how to make passive income and get blog noticed, as well as extra resources to guide you.
Ready to Learn How to Start a Photography & Make Passive Incone? Skip the Intro & Jump to Step 1 Here
Key Takeaways
- Pick your domain name from Namesilo – This will be your blog’s home on the internet.
- Choose Bluehost for web hosting – My top pick for new bloggers. After you register, link your domain.
- Access WordPress – The ideal platform for any type of blog, and it’s already set up with Bluehost.
- Install essential plugins like Yoast SEO, WP Rocket, and Updraft Plus to enhance your blog’s functionality and performance.
- Create your blog and start posting – Here’s where the fun kicks off!
- Promote your photography blog through social media platforms, especially Instagram and Pinterest, and implement SEO best practices to increase visibility
- Monetize your photography blog through affiliate marketing, sponsored content, and selling your photography services or products.
By the way👋, if you need help with WordPress photography blogging, you can reach out to me here.
Why Start a Photography Blog?
Save/Pin the image below👇because I often update my posts. So stay informed with this blog “How to Start a Photography Blog” and save it.
This page have some affiliate links. In other words, if you buy from my links, I may get a commission. Some images were sourced from Unsplash+ (Getty Images, Alexander Mils, Sincerely Media)
A photography blog showcases your work, builds your personal brand, and connects you with potential clients.
It serves as a digital portfolio, demonstrating your skills and style to a global audience.
Blogging about photography techniques and experiences can establish you as an expert in your field.
Starting a photography blog opens doors to monetization through affiliate marketing, sponsored content, and selling your photos or services.
It’s a platform for storing and organizing your images while fostering a community of like-minded photographers and enthusiasts.
Besides earning money, you can showcase your passion for photography and inspire others.
How to Start a Photography Blog in 11 Steps
Setting up your blog with Bluehost is quick and easy. You’ll be ready to showcase your photos in no time.
Step 1: Choosing your niche
Narrowing down the niche of your photography blog sharpens your content and attracts a specific audience.
You could choose a niche like landscape, wedding, or food photography to establish expertise.
Alternatively.
You could teach others how to improve their photography skills? Or perhaps focus on photo editing techniques?
Maybe you’d prefer writing reviews of photography gear? Or a mix of gear reviews and tutorials?
Specializing in one area allows you to create targeted, high-quality content that resonates with your readers.
Your chosen focus should align with your skills, interests, and market demand.
Don’t forget about making money.
Even if you’re a hobby blogger, it’s smart to think ahead about earning from your photography blog.
However.
Before you decide on a subject for your photography blog, make sure to evaluate the potential for traffic and earnings.
Writing about an uninteresting topic won’t help you attract readers or earn money.
Four quick ways to do this is to…
- Compile a list of influential blogs in your niche and analyze their level of traffic.
- Use Ahrefs free Website Traffic Checker to investigate the amount of traffic it generates.
- Check Google Trends to compare potential sub-niches. If you’re deciding between several, see which one has the highest search volume.
- Then investigate how these successful blogs are making money online.
No need to stress if you can’t decide on your niche right away.
It’s fine to take a day or two to choose the perfect niche for your photography blog before proceeding.
If you are still unsure on a photography blogging niche, then check out my article on How to Choose a Profitable Blog Niche
Step 2: Choose a blogging platform
Self-hosted WordPress stands out as the top choice for photography bloggers.
It offers full ownership and extensive customization options. In other words, you’ll have more freedom.
WordPress powers over 40% of all websites, providing a robust foundation for your blog.
But.
Avoid WordPress.com due to its limitations on monetization and design flexibility.
For hobby bloggers, it’s a decent free platform, but it’s very restrictive.
The main problem is that your blog isn’t really yours.
They have the power to close it without warning and control how you can earn money from it.
Simply put, if you want to build a serious photography blog, go with self-hosted WordPress.
Step 3: Register a blog name
Selecting a domain name is crucial for your photography blog’s identity.
The best domain names generally reflect your personal brand or your blog’s theme, whether it’s about photography or something niche.
Aim for a name that’s brandable and memorable.
The catchier, the better.
Choose a name that’s catchy, easy to remember, and reflects your photography style.
Here are a few tips to keep in mind.
- Avoid hyphens and numbers
- Aim for a .com extension
- Stay away from trademarked brand names when choosing your domain name.
- Select a general domain name – Avoid putting narrow terms like “food photography” in your domain. Use broader phrases like “photography” or “imagery” to give your brand flexibility to shift focus in the future.
I recommend using Namesilo.com to search for available domains and register your chosen name.
So go to Namesilo and register your photography domain now.
By the way👋, if you need help with your photography blog, you can reach out to me here.
Step 4: Installing WordPress on Bluehost
Your domain is like the street address of your site, while the web host is the engine that keeps it going.
How to sign up hosting with Bluehost?
First, click here to visit Bluehost to get your WordPress hosting options.
Then select a hosting plan that fits your needs.
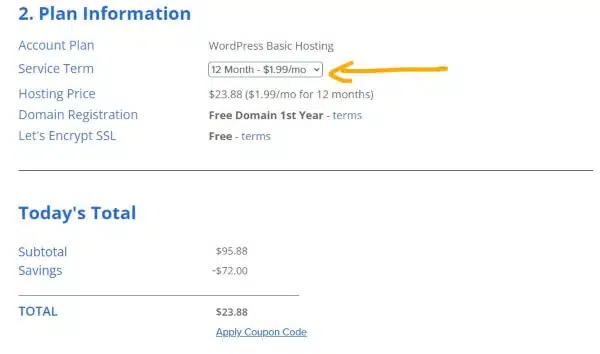
For new bloggers, I recommend going with the Basic Plan, which starts at $1.99 a month for a 1 year plan.
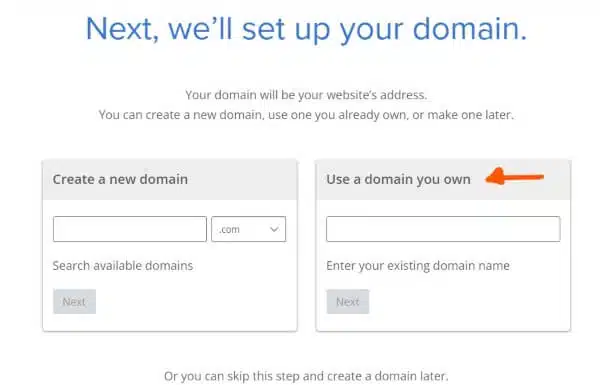
Then select ‘Use a Domain You Own‘.
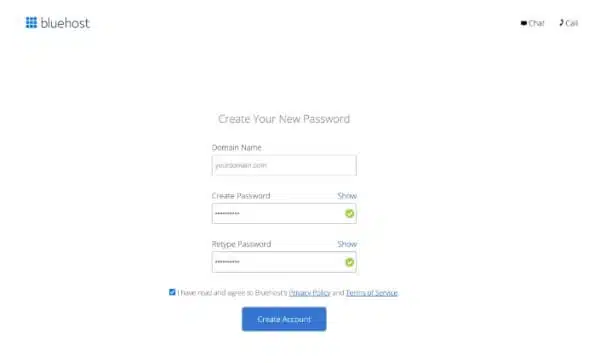
Create your account, choose your service term, provide billing information and make payment.
Look out for an email from Bluehost with your receipt and account info, including your username and password.
Save that email for future reference.
Complete the setup for your Bluehost account and WordPress blog
Once your payment is successful, let’s finalize your Bluehost account and blog setup.
On the page you see after paying, click on Create your account:
Click on Create your website to get started.
You’ll be taken through a series of questions about your website. You can answer it or skip it for later.
You’ll then have a choice to use AI to design your photography blog or choose free WordPress themes to set up your custom blog (more on this soon).
And you have the option to skip this step.
From there, Bluehost takes care of the installation and setting up WordPress for you behind the scenes.
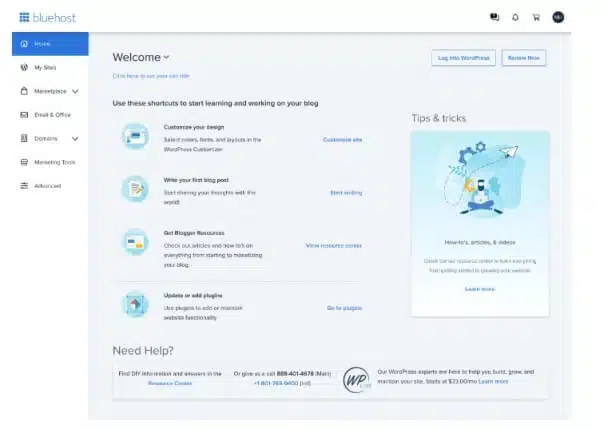
Once it’s finished, you’ll be redirected to your Bluehost Portal, your central dashboard for managing your Bluehost account.
Access your WordPress dashboard
Click on “Log into WordPress” through your Bluehost Portal:
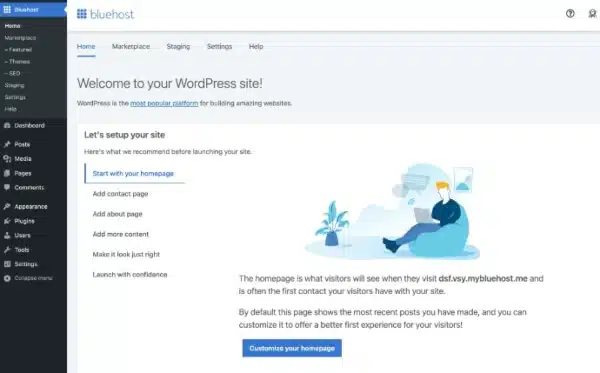
Your WordPress dashboard will open in a new tab. This is your control center for managing your blog website:
The dashboard has a lot going on, so take a few moments to get familiar with it.
The menu on the left-hand side is your main navigation tool. You’ll use it to manage the key aspects of your blog.
Get to know the admin area of your WordPress blog step-by-step.
You’ll spend a lot of time here and will gradually learn how WordPress works.
You will also quickly find out how to change the look of your blog and add new features like contact forms or social media buttons.
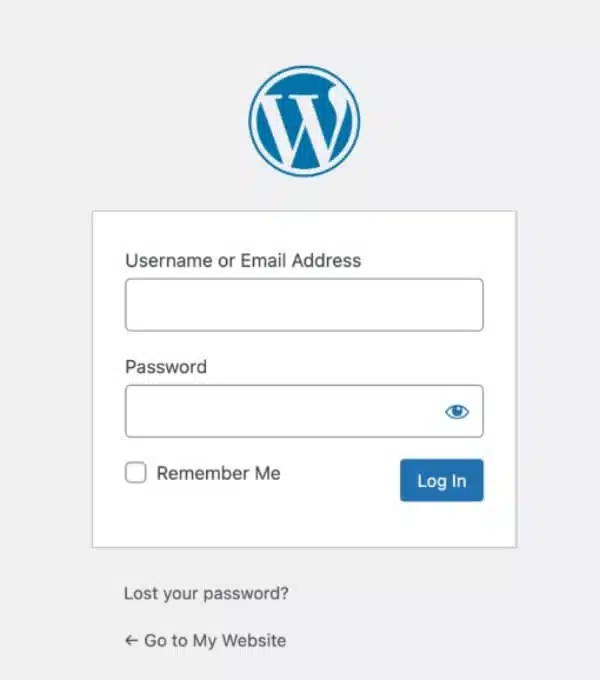
Log in to WordPress through your domain name
As mentioned earlier, you can access your WordPress dashboard via the Bluehost Portal. But you can also log in directly using your domain name.
The default login URL is your domain followed by “/wp-admin”.
For instance, if your domain is myblog.com, your login URL will be “myblog.com/wp-admin”.
To log in, just enter your WordPress username and password, then click Log In.
Step 5: Designing your blog
Your blog’s design sets the tone for your photography showcase. Pick a theme that complements your style and customize it to stand out.
Choose a WordPress theme
The design and layout of your WordPress blog are determined by “Themes”.
Your theme controls how your blog looks and feels.
For beginners, it’s best to start with free WordPress themes.
Premium themes can be confusing and you want to keep things simple.
Once you have more traffic and content, you can consider a paid premium theme.
Focus on writing great blog posts to bring visitors to your blog right now.
How to pick a WordPress theme for your photography blog
When you set up a blog with the steps above, WordPress comes with a few default themes already installed.
Your site looks good right away, so you can leave it as is. You can change the theme later if you want.
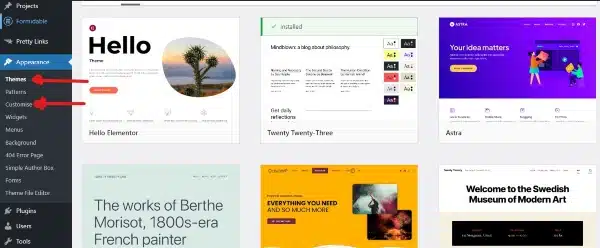
To choose a free theme, go to Appearance > Themes > Add New > Popular:
Look for a WordPress theme that’s simple, easy to use, and beginner-friendly. Avoid complex themes with too many features for now.
From the selection of themes provided, pick a theme you like and click Install.
After it’s installed, click Activate.
That’s how you add a WordPress theme to your blog!
Now you can see your blog’s new look.
Hover over your blog’s name in the top left corner and click Visit site to view the new homepage:
By the way, free themes you can consider using are Kadence or Astra.
Customizing your theme
Customizing your WordPress theme lets you create a unique look for your photography blog.
The good news.
Most themes come with the WordPress Customizer. This tool lets you tweak the look of your theme.
To access it, go to Appearance → Customize.
Navigate through the menu options.
Your changes will show up in real-time on the right side of your screen.
Start by exploring the theme’s built-in options – adjust colors, fonts, and layouts to match your style.
Use the WordPress Customizer to preview changes in real-time.
For advanced customization, consider child themes or custom CSS to modify specific elements without altering the core theme files.
After finishing, click the Publish button to make your changes live on your blog.
Next, focus on these two key areas:
- Widgets – Use these to enhance your sidebar and other widget spots. You can add features like recent blog posts or social media links. Widget areas may vary by theme, including footer widgets.
- Menus – Set up your site’s navigation menu here. This is crucial for helping visitors navigate your blog.
Design considerations and branding
Your blog’s design should reflect your unique photography style.
Choose colors, fonts, and layouts that complement your images.
Consistency in branding across your site builds trust with visitors.
Use a clean, uncluttered design to showcase your photos effectively.
Implement responsive design for optimal viewing on all devices.
Ready to Learn How to Start a Thriving WordPress Blog? Click Here Now
Step 6: Install must-have plugins
WordPress plugins are essential for launching a blog and adding key features.
They simplify your work, enhance your readers’ experience, and boost your search engine rankings.
However, a word of caution: Randomly installing plugins can lead to various issues with your blog.
Only install plugins that are absolutely necessary. “Nice-to-have” plugins often cause trouble.
To help you choose wisely and avoid issues, here’s a list of must-have WordPress plugins for your blog:
| Plugin | Description |
|---|---|
| All in One SEO | The AISEO plugin helps optimize your content so search engines can find and show your blog to your target audience in search results. |
| UpdraftPlus | Sometimes things go wrong, and you may need to restore a backup to fix issues. UpdraftPlus is the top free WordPress backup plugin that lets you save and restore past versions of your blog. |
| WP Rocket | Fast-loading websites rank higher on Google and get more free traffic. WP Rocket speeds up your site by caching pages and reducing file sizes. |
| Elementor | Elementor is a powerful page builder that lets you customize your blog design and create beautiful templates for your posts. |
| Antispam Bee | Antispam Bee is the best free anti-spam plugin for WordPress. It filters and blocks all spam comments, saving you time and keeping your blog clean. |
| Insert Headers and Footers | Sometimes you need to add custom code snippets to your blog, like a tracking code from Google Analytics. Insert Headers and Footers makes it easy to do this in seconds. |
| Email Address Encoder | If you want to publish your email on your Contact page, spammers might find it. The Email Address Encoder plugin hides your email from bots, preventing spam. |
How to install WordPress plugins
Start by going to Plugins → Add New.
Search for free plugins using the search box. Once you find a plugin you want, click Install. Then, click Activate to use it.
You can also manually install plugins, which is useful for those downloaded from WordPress.org or for premium plugins.
To do this, click the Upload Plugin button at the top. Then, upload the plugin’s .ZIP file to install it.
Step 7: Set up an image gallery for a photography blog
WordPress offers built-in gallery features, but plugins like Modula provide more flexibility.
Choose a layout that showcases your photos effectively.
Organize images into categories for easy navigation, and use descriptive titles and alt text.
This improves user experience and boosts SEO.
Plus, you’ll need to do the following:
- Optimize your photos for web viewing.
- Resize large files to reduce load times, and use a consistent aspect ratio for a clean look.
- Add captions to provide context and engage visitors.
- Consider watermarking images to protect your work.
A well-designed gallery attracts viewers and keeps them exploring your blog longer.
Below is a table summarizing of what you need to do with your images .
| Task | Tools | Purpose |
|---|---|---|
| Optimize photos for web viewing | TinyPNG | Reduce file size for faster loading |
| Resize large files | BeFunky, Canva | Reduce load times and maintain a consistent look |
| Add captions | Any photo editor | Provide context and engage visitors |
| Watermark images | BeFunky, Canva, Photoshop | Protect your work |
| Design a well-structured gallery | WordPress, Gallery plugins | Attract viewers and encourage exploration |
Step 8: Create essential pages
Essential pages form the backbone of your photography blog.
These are the pages you should consider adding to your photography blog:
- Home page: The homepage is the first thing visitors see when they come to your blog. It should clearly explain what your site is about and who it’s for. Highlight your top content and make navigation simple so visitors can easily find what they need.
- About Me page: to showcase your personality and expertise.
- Contact page: with clear communication channels.
- Service or Product page: If you something to sell why not give it a plug with dedicated page.
- Privacy Policy and Terms of Use page: This is a must. These pages are used to address legal requirements and build trust. You can easily and quickly create these pages with PrivacyPolicies
Place these pages in prominent locations, like the main menu, for easy access.
Use concise language and compelling visuals to enhance user experience on these crucial pages.
How to publish your essential pages
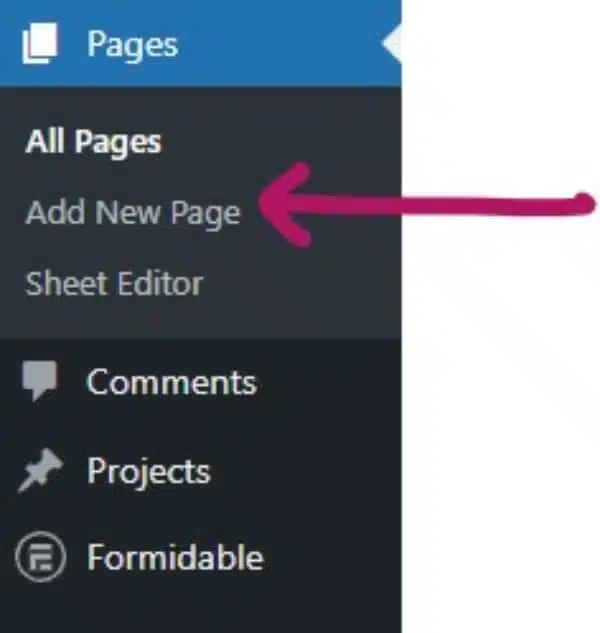
To create a page, go to Pages → Add New.
Where you are taken to the Gutenberg Editor.
Gutenberg is a block editor where you add blocks for everything. For instance, to add an image, you’d use an image block.
For text or headings, simply add the relevant block. When you hover over a block, an options bar appears, and you can save blocks to reuse.
Click the blue + button at the top or press return for a new line to add a block.
Gutenberg plugins offer more block types, but WordPress’s built-in blocks are usually enough.
Page options like permalink and featured image are on the right.
More options appear when you select a block.
SEO or social sharing plugin options may also appear here or below the editor.
To add content:
- Title your page
- Add content
- Save your page
- Customize your permalink (e.g., domain.com/about/)
- Preview or publish your page using the top right buttons.
Step 9: Publish your first blog post
Ready to start your WordPress photography blogging journey?
Here are a few tips to keep in mind:
- Focus on creating visually appealing and helpful content with high-quality images and engaging text.
- Share your unique perspective or a recent photography project to connect with your audience.
- Keep it concise, around 500-800 words, and include relevant keywords for better search engine visibility.
How to start a new photography blog post
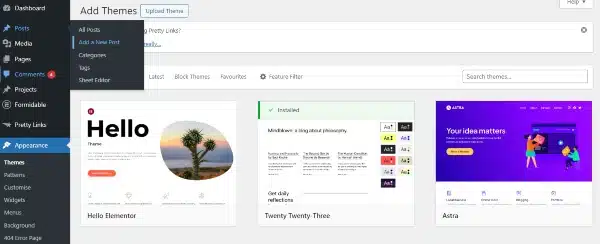
This process is much like adding a page, but you’ll go to Posts → Add New instead.
Create a new post on your WordPress site.
The post editor works similarly to the page editor, with a few extra options on the right.
Follow the same steps: add a compelling title, content, save, customize your permalink, etc.
Consider adding a featured image and some categories. You can then publish or schedule your post.
If you’re stuck for ideas, I have a list of 95 blogging post ideas for beginners to help you out.
But …
Before you start writing, remember that focusing on keywords is key to getting traffic and making money from your blog.
A keyword-focused content strategy means creating blog posts around terms people are searching for on Google.
If done well, Google will rank your posts high, bringing traffic to your site.
But with a new website, you can’t rank for just any keyword, no matter how good your content is. The more popular a keyword, the harder it is to rank for it, especially for new blogs.
So, it’s crucial to find low-competition keywords with decent search volume. These are the easier targets for new bloggers.
Use a free tool like Google Keyword Planner or Ahrefs or better still SE Ranking to discover low-competition keywords that still get a good number of searches each month.
Here are a few more helpful pointers to implement into your photography blog post.
- Know the search intent. Before diving into writing, think about the “why” behind the keyword. Understand why users are searching for this topic so you can fully address it in your blog post.
- Plan your blog post. Draft a brief outline before you start writing. Even just noting down the main headings can help organize your thoughts and structure your post effectively.
- Write for your audience. Always tailor your content to your readers. A guide for beginner photographers on camera settings will differ greatly from advanced tips for experienced photographers.
- Show your personality. Don’t hesitate to share personal stories and let your personality come through in your writing. Readers prefer blogs that feel human and relatable.
- Use images. For a photography blog, images are crucial! Use your own photos to support and illustrate the points in your posts.
- Create tutorials. Make step-by-step guides for photography techniques like lighting, post-processing, or specific camera settings.
- Link to other posts. Add links to your other blog content where it fits. This keeps readers on your site longer and boosts SEO.
Create a blog post title that grabs attention
Let’s begin at the top with the field for your post title:
Add title – WordPress Gutenberg editor
The main reason people visit your blog is because they see a captivating blog post title, right?
So, it’s important to learn how to craft catchy, engaging headlines and, even more crucially, deliver what your headline promises.
Start by researching your niche.
Look through other bloggers’ headlines and notice these key points:
- Do they often use numbers?
- How many headlines start with “how to”?
- Do they capitalize the first letter of each word?
- What benefit words do you notice, e.g., “easy”, “quick”, “instant”, “proven”?
- How many headlines include parentheses?
Remember, you can always update your headline later.
If you’re unsure about your headline, search for your target keyword phrase on Google.
It’s okay to get inspiration from others in your niche, as long as you don’t copy their ideas.
Lastly, use the free CoSchedule headline analyzer to perfect your headline. Just enter your title and click Analyze Now to get tips for improvement.
Optimize your blog post layout for easy reading
Starting with your first blog post can feel overwhelming, especially when it comes to formatting.
Thankfully, there are some design guidelines to help you out.
The aim is to make your blog post as readable and scannable as possible.
People don’t have long attention spans.
If they can’t quickly find what they need or if your post is just one big block of text, they’ll move on.
That’s why the layout and design of your post are as crucial as the content itself.
Here are some essential rules for a great blog post layout:
- Ensure readability:
Use simple colors, fonts, and layouts. Keep distractions to a minimum and make the reading experience pleasant. Your font should be at least 16px, with plenty of white space and short paragraphs. - Divide the text:
Structure your post with headings and lists for better readability. For each paragraph, keep it at 2 sentences. Include relevant images to break up the text. - Bold and italicize sparingly:
Highlight key points with bold and italics. Use them only for the most important words or phrases—less is more.
Select an SEO-friendly URL for your blog post
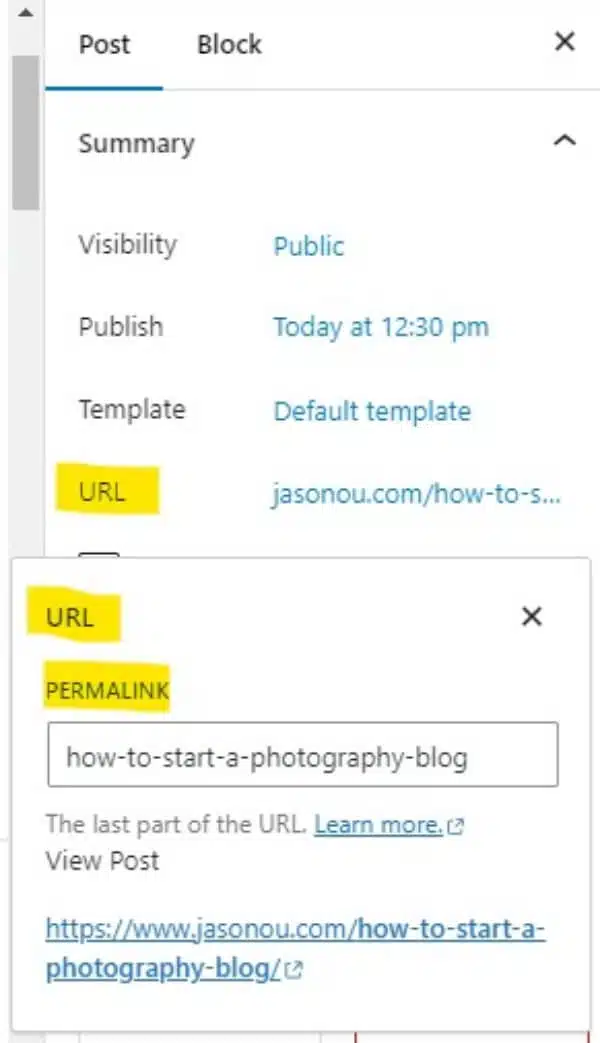
Also known as the permalink, your blog post URL should always feature the main keyword.
You only need to write one article for each target keyword phrase, so duplicate permalinks aren’t a problem.
Permalinks should be easy to remember and read. Use just your target keyword phrase for simplicity.
When your article is finished and ready to go live, update the permalink in the Post settings:
Step 10: Blog promotion strategies
Growing an audience is one of the hardest parts of starting a blog.
The strategies you use will depend on the content you create and your overall objectives.
The key is to identify who your audience is and find ways to get your content in front of them.
One key way is to create SEO-friendly content. (Get the tips in the table below).
But there are additional steps to increase your blog’s visibility and attract traffic.
Here are some strategies to promote your photography blog:
- Join photography communities online: Participate in groups and forums for photographers. Share your blog content when it can answer a question or provide useful information.
- Host a photography workshop: Plan an online or in-person workshop to teach a specific skill, and direct participants to your blog for more details.
- Use Instagram: Share your photos and blog content on Instagram. Engage with your audience by using relevant hashtags and interacting with followers. Link back to your blog in your bio and posts.
- Use Pinterest: Create visually appealing pins that link back to your blog posts. Join photography-related boards and actively pin your content to reach a wider audience. Check out my guide on how to use Pinterest for blogging.
- Guest blogging: Reach out to other photography blogs and websites to offer guest posts. This can expand your audience and improve your SEO.
- Start an email list: Use an opt-in form on your blog to gather subscribers. Offer a freebie, like a guide with photography tips, for signing up. Use newsletters to drive traffic to your site or promote products.
Whatever you do, make sure your approach is authentic and valuable. People won’t be interested if you’re not providing real value.
SEO best practices for photography blogs
Use these blogging best practices to rank higher in search results:
| SEO Practice | Description |
|---|---|
| Optimize Image Alt Text | Add descriptive alt text to images, including relevant keywords |
| Use Relevant Keywords | Include photography-related keywords in titles, headings, and content |
| Create Unique Meta Descriptions | Write compelling meta descriptions for each post to improve click-through rates |
| Optimize URL Structure | Use clear, keyword-rich URLs for blog posts and pages |
| Improve Site Speed | Compress images and use caching to enhance loading times |
| Build Quality Backlinks | Collaborate with other photographers and industry websites for links |
| Create Long-Form Content | Publish in-depth articles on photography topics (1500+ words) |
| Use Internal Linking | Link related posts and pages within your blog to improve navigation |
Implement these practices consistently to get your blog noticed.
Monitor your blog’s performance using analytics tools. Adjust your strategy based on results to improve search rankings.
Step 11: Monetize your photography blog
Now that your photography blog is up and running, you might want to start earning some money from it.
This is a big topic, so I’ll share a few quick ideas to get you going.
Here are some common ways to monetize a blog:
- Offer photography services
- Write ebooks
- Join affiliate programs
- Sell physical products
- Sell digital products
- Develop courses
- Use display ads
- Freelancing
I can’t say which method is the best for your blog since it depends on your specific focus.
If you’re aiming to educate, consider creating courses or ebooks. There are many platforms available to help you with this.
Affiliate programs are also a great fit, especially if you’re reviewing camera gear.
Once your blog gets more visitors, display ads can be a good option.
For new blogs, Media.net (or even Google Adsense) is a good start because they have low traffic requirements.
You could also run online training classes or webinars, or offer coaching and consulting services to brands.
There are many options out there.
Hopefully, this gives you a good start to monetizing your photography blog.
By the way👋, if you need help with help with starting a blog, you can reach out to me here.
Maintaining Your Blog
Keeping your blog fresh and engaging requires regular updates and interaction with your readers. A thriving photography blog needs consistent posting and active audience engagement.
Blog consistently
Consistent posting forms the backbone of a successful photography blog.
Aim to post at least once a week to keep your audience engaged and improve your search engine rankings.
But, set a realistic schedule.
Whether it’s every Monday or twice a month, just stick to it.
Your readers will anticipate new content, fostering loyalty and increasing return visits.
Engaging with your audience
It goes without saying You need to respond to comments promptly and thoughtfully.
Share your photography tips, techniques, and experiences through blog posts and social media updates.
You could even create polls, contests, or challenges to encourage audience participation and foster a sense of community around your photography blog.
Continual learning and updating
Stay ahead in the photography blogging game by embracing new tactics and strategies.
Follow industry leaders on social media, attend workshops, and experiment with new techniques to keep your blog content fresh.
By update your blog regularly with the latest trends, gear reviews, and editing software insights – your readers will appreciate your commitment to growth and innovation.
How to Start a Photography Blog And Make Money in 2025: The Wrap
Well done on getting your photography blog up and running!
It’s now time to introduce it to the world and start creating your content.
Keep in mind that your content should be designed not just for your audience, but also for your revenue plan.
Think of your content as the entry point of a funnel that guides readers towards the products you’ll sell or promote.
Remember. Learning how to start a photography blog is just the beginning.
Now it’s time to focus on crafting engaging content and connect with fellow enthusiasts.
By the way👋, if you need help with help to start a blog, you can reach out to me here.
FAQs: Fun Blog Post Ideas
Still got questions?
What do I need to start a photography blog?
You’ll need a digital camera (DSLR or point-and-shoot), web hosting, and a blog platform like WordPress.org. Don’t forget tripods and editing software like Adobe Lightroom or Skylum Luminar Neo.
Are photography blogs worth it?
If you truly love photography and want to share it with others, creating a photography blog is a great idea. You can inspire and educate fellow photographers, make money by posting valuable photography content, build your personal brand, and grow your professional network.
How do I choose a niche for my photography blog?
Pick a focus – landscape photography, portrait photography, or color film. Your niche should match your skills and interests. It’ll help you stand out and attract the right audience.
Should photographers have a blog?
Absolutely! A blog lets photographers showcase their work, share tips, and connect with a broader audience. It’s a fantastic way to inspire others, build a personal brand, and even make money from your passion for photography.
How do I start a successful photography blog?
Choose a specific niche. Then pick a memorable domain name and reliable hosting. Use WordPress for easy blog management. Focus on creating high-quality content, and share your posts on social media. Regular updates and interaction with your readers are key to success.
Can I use stock photos on my blog?
Yes, but be careful. Use sites like Unsplash for free, non-trademarked images. Always credit the photographer. Better yet, use your own photos to showcase your skills.
How do I grow my blog’s audience?
Share on social networks and Pinterest. Build an email list. Offer online courses or training. Use search engine optimization. Engage with other photographers on platforms like Flickr.
Can I make money from my photography blog?
Yes. Display ads, sponsored posts, and selling your photos are options. Join an ad network. Offer photography services. Create and sell online courses or e-books for Kindle.
How important is AI in photography blogging?
AI is growing in importance. It can help with editing (Luminar Neo), content creation, and even interacting with readers through AI bots. But remember, your unique eye is still key.
Disclosure: This post may contain affiliate links, which means I’ll receive a commission if you purchase through my links, at no extra cost to you. Please read full disclosure for more information.
You Might Want to Check This Out Too
Resources To Grow Your Business With
Pinteresting
Struggling to get traffic from Pinterest? Pinteresting Strategies 2025 by Carly Campbell reveals a manual pinning method that works—even with algorithm changes.
This course walks you through step-by-step strategies to pin effectively, increase engagement, and grow your blog without relying on expensive schedulers.
Carly has used this exact system to bring in 100,000+ page views in just months, and now she’s sharing it with you.
Stop guessing and start seeing real results today!
Bluehost
Bluehost is a great starting point for beginners or bloggers who want to switch to a reliable web hosting service. And it gives you the best bang for your buck - starting at $2.95 a month*.
With the entry-level hosting plan, you'll get a high up-time, reliable customer support, FREE domain name (first year) and 30 day money back guarantee.
You can sign up with Bluehost here.
WPX Hosting
It's a web-hosting service I love using. It specializes in WordPress hosting, and depending on what package you opt for, you can host 5 or more sites on one account. The best bit is - the quick turnaround in support is top notch.
For bloggers who have an established blog, this is a fantastic option.
You can learn more about this service here.
Aweber
Building an email list of a growing audience is essential for the longevity of any business. This autoresponder service is easy to use, and it is a great starting point for someone looking to kickstart their email campaign.
Hi, I’m Jason Ou (surname aka, Oh). I am a Solopreneur and Blogger. My mission is to help fellow entrepreneurs (like you) to profit from their passion online. Let’s connect on Facebook now.

