How to Start a Sports Blog And Make Money in 2025 | Step-by-Step

How to Start a Sports Blog And Make Money in 2025 | Step-by-Step

How to Start a Sports Blog And Make Money in 2025 | Step-by-Step

Starting a sports blog can be a challenge, but with this step-by-step guide, you can turn your passion for sports into WIFI money.

But first, let’s take a step back.

The worst thing you can do when starting a sports blog or any blog is to launch it like an amateur.

Like throwing a bunch of content and then sitting back to watch a truckload of traffic come flooding in. Sorry, that’s not how to start a sports blog.

Listen.

Sports blogging is more than that. You need a well-oiled blogging terminator plan loaded with research, sport blog ideas, engaging content, and marketing strategies. The works.

With that said.

If you’re a sports fanatic and you really want to share your views on your favorite teams, players, and games then here’s a no-nonsense step-by-step guide on how to create a sports blog in under an hour.

And transform it into a thriving online platform.

So let’s dive in so you can be a successful sports blogger. (As long as you give it your all.)

How to Start a Sports Blog And Get Paid in 10 Steps

Blog banner on how to start a sports blog

This page have some affiliate links. In other words, if you buy from my links, I may get a commission.

This step-by-step guide is lengthy but packed with the good stuff you need to launch a sports blogging business.

So I suggest you grab your favorite drink and snack.

By the way. I have a blog launch checklist guide posted here

If at any time, you feel confused, you can check out my blog launch checklist guide here.

Or feel free to reach out to me here.

I’ll help you as best I can so you can launch a successful sports blogging career.

1. What’s Your Sports Niche?

To start a sports blog, you must choose a niche that aligns with your interests, knowledge, and expertise.

Buy don’t go broad and cover all things related to sports. Don’t be the ESPN of sports. It’s just too hard for a new sports blogger.

Instead, cover a specific sport to launch your sports blog.

By focusing on a specific area within the broader sports landscape, you can establish yourself as an authority in that space and build a loyal audience that values your insights and opinions.

Choosing a niche for your sports blog has several benefits.

  1. It’s easier.
  2. It allows you to differentiate yourself from general sports blogs that cover everything from basketball to golf. By narrowing your focus, you’ll attract a more targeted audience interested in your specific niche.
  3. It helps you develop your unique voice and perspective on the topics you cover. By focusing on a laser-targeted area, you can offer more in-depth analysis that resonates with your readers.
  4. It makes it easier to monetize your sports blog by attracting advertisers and sponsors who are interested in your niche audience.
An image of a baseballer. How to start a sports blog and get paid online.

How to become a sports blogger in your niche?

To select the right niche, consider your interests, knowledge, and expertise.

  • Ask yourself the following.
  • What sports do you follow closely?
  • Will you cover the major leagues, college, or a local league?
  • What teams and players are you most knowledgeable about?
  • What topics and angles do you enjoy writing about?
  • Will you cover a sports team or the entire league?

By answering these questions, you’ll be able to narrow down your focus and identify the niche that aligns with your passion and expertise.

And one more thing. It’s a big one. Know who your ideal readers will be. Here’s why.

Knowing your target audience matters because it enables you to tailor your message and approach to connect with and engage them effectively.

By comprehending their demographics, interests, and needs, you can create content that resonates with them and directly addresses their concerns.

When you can deliver what they want, not what you want. You will grab their attention and slowly build trust.

And guess what. With more trust, you can lead your readers to take the next action, such as purchasing a product, signing up for a service, or engaging with your content.

Moreover, understanding your target audience can help in identifying new growth and expansion opportunities by utilizing your insights to develop new products or services that satisfy their needs and desires.

Ultimately, knowing your target audience can enhance the effectiveness of your marketing efforts and facilitate building stronger, more meaningful relationships with your customers.

That said.

Some More Brainstorming Ideas For Starting a Sports Blog:

  • You can start a sports blog by covering a sports team locally. It can be high school, college, or the professional level.
  • You can blog about the players in the teams by highlighting their strengths, weaknesses, achievements, upbringing, and more.
  • You can blog about the recent rounds of matches and play.
  • You can blog about the fitness and nutritional programs used by top-performing individuals.
  • You can provide the latest updates on the team, player movements, and the league. A good example is Transfer Tavern.
  • You can provide a sports blog (like WhoScored) on stats and analysis.
  • You can blog about a team.
  • You can blog about the equipment, merchandise, and uniforms.

Here are some popular sports blog ideas to consider:

  • Fantasy Sports: If you’re an avid fantasy sports player, consider starting a blog that covers strategy, rankings, and analysis for popular fantasy sports leagues like the NFL, NBA, and MLB.
  • Team-Specific Blogs: If you’re a die-hard fan of a particular team, consider starting a blog that covers news, analysis, and opinion pieces about your favorite team.
  • Sports Betting: If you’re knowledgeable about sports betting and want to share your insights and strategies, consider starting a blog that covers sports betting tips, trends, and analysis.

(I like to say here that I’m no gambler and I have no idea how betting works. I don’t want to know. But some of you may have some knowledge that can help people who are into sports betting. You do your thing. As always, gamble responsibly.)

  • Sports Technology: If you’re interested in the intersection of sports and technology, consider starting a blog that covers sports gadgets, wearables, and data analytics.

By choosing a niche that aligns with your interests and expertise, you can establish yourself as a trusted authority in your space and build a loyal audience of readers who value your insights and opinions.

2. The You.

Image of a sports bloggers learning how to set up a sports blog on WordPress.

Now that you’ve decided to go all in and make a name for yourself in the blogosphere. This means you need to build a killer brand so you can set yourself apart from other sports bloggers.

However, it’s not just about having a fancy logo or trendy color scheme – it’s about creating a unique identity that resonates with your readers.

Here are 2 strong reasons to establish a strong brand for your very own sports blog:

A. Why Do You Need a Brand?

Building a brand is the key to making a name for yourself in the blogosphere. It’s not just about your logo or color scheme – it’s about the overall image and perception your readers have of your blog.

With a strong brand, you’ll be able to connect with your audience, stand out from other sports bloggers, and attract new readers.

B. Establishing Your Brand Identity

First things first, figure out what makes your blog special.

Define your mission, vision, and values, and figure out who your target audience is. Once you have a clear idea of what makes you unique, start developing your visual brand.

This includes your logo, color scheme, typography, and more.

Make sure your brand is consistent across all your online channels, from your blog to your social media profiles and email campaigns.

Side note: Look. I’m all for the branding and pretty logos, but don’t spend hours on it trying to be perfect. Most likely, it will take some time before your blog gets any decent traffic.

Your time is best spent on creating epic content and then promoting your sports blog so you can drive eyeball traffic to the content soon.

Worry about the fancy stuff later.

3. Leverage You to Attract Readers.

Now that you have your brand identity sorted, it’s time to make it work for you!

But I like to point out that Step 3 is not the next step of launching the blog itself. Confused?

Let me explain.

This step here is prepping you that high-quality content plays a huge part in becoming a successful sports blogger.

When you create high-quality content that aligns with your brand values and your readers, you are positioning yourself as an authority in your niche.

Using your personal brand, you can collaborate with other bloggers and influencers in your space, and engage with your audience on social media and via email.

You need to keep promoting your brand, and your sports blog and establish yourself as a thought leader in your niche to attract new readers and build a loyal following over time.

Do that and you’ll be well on your way to creating an amazing brand for your sports blog. (More on the marketing stuff later.)

So keep this in mind as you learn how to start a sports blog.

Moving on.

4. Sign Up for a Blogging Platform.

Image of magnifying glass zooming in on a chalk board. with the word WordPress written on it. Another step to starting a sports blog.

So you’ve got your niche and brand identity all sorted out – that’s awesome!

Now it’s time to get on a blogging platform. A blogging platform is basically a tool that lets you create, publish, and manage your blog content.

Which is great.

Also, you have a huge number of blogging platforms to choose from. Some are free, and some are not.

Look. While the free ones sound great and all, it isn’t.

That’s because.

  1. Free platforms will have their own sponsored ads on your blog.
  2. You will have less flexibility in the creative design and look of your blog. In other words, you will look unprofessional.
  3. You will have less room to grow your sports blog, and or any blog.
  4. Worse still, you don’t own your sports blog.

I don’t want to spout on too much, but if you want to be a successful sports blogger then you need to invest in a platform that will allow you to grow.

And when you invest in something, you’re investing in a business. This is why starting a sports blog for money is all about. Right?

So what’s the best place to start a sports blog?

I recommend using WordPress (the dot org one).

You have the flexibility to customize your sports blog and do loads more with it.

Although there are a bunch of options out there, I reckon WordPress is the bee’s knees for starting a sports blog. Here’s why:

A. Why Use a Blogging Platform?

Using a blogging platform has loads of benefits, including:

Ease of use: Most blogging platforms are super user-friendly, even if you’re a total newbie.

Customization: Many blogging platforms offer different templates and design options, so you can make your blog look exactly how you want it.

Scalability: Blogging platforms are designed to handle a ton of content, so it’s easy to grow your blog over time.

B. Why WordPress is the Best Platform for Sports Blogs

WordPress is the most popular blogging platform in the world, powering over 40% of all websites on the internet. There are heaps of reasons why we think WordPress is the way to go for your sports blog:

  • Easy-peasy: WordPress is so easy to use, even if you’re new to blogging. You can create and publish posts in a jiffy thanks to its user-friendly interface.
  • Make it your own: With thousands of templates and design options available, you can give your sports blog a unique look and feel that’s all yours.
  • Search engine-friendly: WordPress is built to be SEO-friendly, so it can help your blog rank higher in search engine results pages (SERPs).

C. Stats to Back Up WordPress

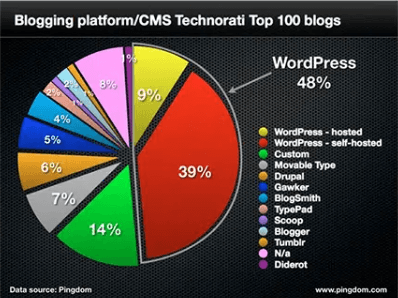
Chart on WordPress usuage. Best platform to become a sports blogger.
Well, well. Just look at the numbers above.

According to Technorati, 48% of the top 100 blogs are WordPress.

Here are some more stats that show why WordPress is the real deal for your sports blog:

By using WordPress for your sports blog, you can make the most of its ease of use, customization options, and SEO-friendly features to create a blog that looks great and draws in readers, all while building your brand over time.

5. Setting Up Your Sports Blog.

Image of a female blogger. How to start a Sports blog.

Well, well, well! You’re on your way to setting up your very own blog. Congrats! Let’s dive into the nitty-gritty of what you need to do:

A. Snag a Domain Name

First things first, you need to score yourself a domain name – this is the web address people will use to find your blog. Make it snappy, memorable, and aligned with your niche or brand. Don’t worry, you can register your domain name with a domain registrar like Namecheap or GoDaddy.

B. Pick a Hosting Provider

Next up, you gotta choose a hosting provider for your blog.

This is the company that’ll store your blog’s files and makes ’em accessible online.

Our top pick? Bluehost.

It’s budget-friendly, dependable, and super newbie-friendly, which makes it an ideal choice for folks who are new to this game. and it has a one-click WordPress installation.

That’s right, you can create a sports blog on WordPress in one click! (More on that in a moment.)

Better still, it has a fast loading speed and very high up-time and for new customers, you get a free domain name in the first year and a free SSL.

You can check out Bluehost here.

C. Install WordPress

Once you’ve got your domain name and hosting all setup, it’s time to install WordPress on your blog.

But don’t sweat it – it’s a piece of cake and can be done via your hosting provider’s control panel.

Once WordPress is installed, you can log in to your blog’s dashboard and start playing around with the design and settings.

Setting up a blog is a major milestone, and it’s gonna be a game-changer for you as a sports blogger.

By grabbing a domain name, selecting a hosting provider, and installing WordPress, you’ll be well on your way to creating a blog that’s not only visually stunning but also full of juicy content that’ll keep your readers coming back for more.

Reminder – you can easily start a WordPress sports blog on Bluehost in one click. More on this next!

How to Create a Sports Blog With Bluehost in 7 Steps.

Image of a male blogger. How to start a sports blog on Bluehost.

Here’s a simple step-by-step guide on how to start a sports blog on Bluehost.

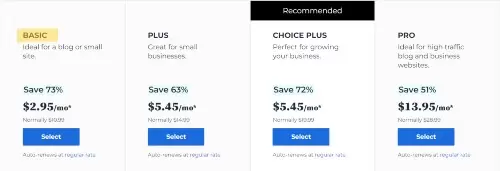
Bluehost Pricing plan.  Step 1 on how to start a WordPress blog on Bluehost

Step 1:

Sign up for Bluehost, head over to their website here, and select a hosting plan that suits your needs and budget.

For rookie sports bloggers, I suggest the ‘Basic’ or ‘Plus’ plan.

The Basic plan itself is cheap, starting at $2.95 a month.

You get 10G of space, 1 FREE domain name (first year only), a FREE SSL, a FREE CDN, customer themes, and a one-click WordPress installation.

You can always upgrade to a bigger plan later.

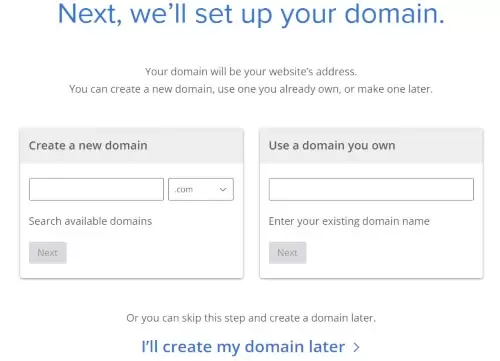
A Bluehost WordPress tutorial on choosing a domain name.

Step 2:

Once you select a plan, you’ll be taken to a page to set up your domain name – this is the web address people will use to find your blog.

If you haven’t decided on one, you can always come back to finalize a domain name.

Real quick on the domain name.

I suggest coming up with a name that is not too specific, like englishroses.com.

Not only is it too super specific, but you’ll also find it very hard to come up with consistent content over time. So go broad with the choice of a domain name. Or use your name as the brand.

You see. When it is a broad domain name, it gives you the flexibility to pivot into other areas of the sports niche, should your first plan goes pear shape.

Bluehost offers a free domain name for the first year, so take advantage of this offer if you don’t already have one.

A Bluehost WordPress Tutorial on choosing and signing up on the registration page.

Step 3:

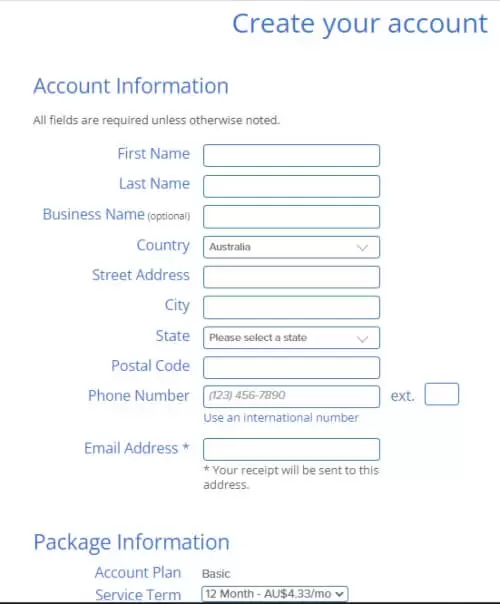
On the next page is the account information. Go ahead and fill in the details.

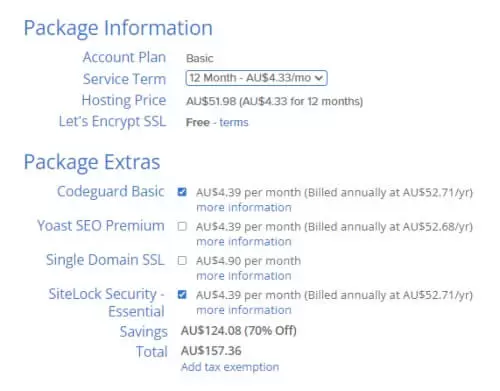
Then the next bit is to choose the “Package Extras”. This is optional.

But for more privacy, you can opt for a Domain Name + Protection offer. This just gives you a layer of protection where your name is not tied to your domain name.

When you get to the “Package Information”, you have the choice to opt for a 12-month or 36-month plan. I suggest going for the 12-month plan.

Bluehost Package information. Another step to starting a Bluehost blog.

Step 4:

Bluehost WordPress tutorial advise on the welcome page from Bluehost.

After you’ve filled in the Payment Information and clicked submit, you’ll get a welcome message from Bluehost.

So click on the Get Started button to enter your password (make it complicated).

And when you have completed that part, you’re ready to start a sports blog.

Step 5:

Next, choose a theme for your blog – the design and layout of your website. Thousands of free and paid themes are available, so find one that fits your style and content. (You can start with the FREE option first.)

Preview and customize different themes to find the perfect one for you.

WordPress Login page. Bluehost WordPress Tutorial about the login page.

Step 6:

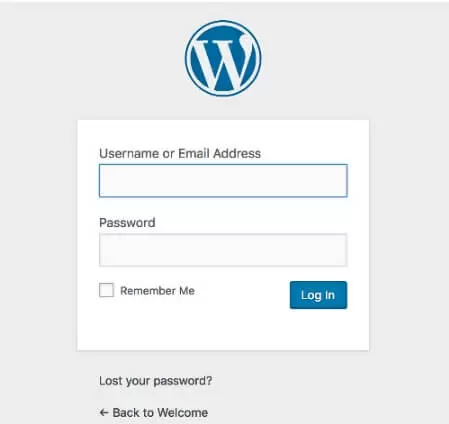
Log in to your Bluehost account, go to the “website” section, and click on the “install WordPress” button. Follow the prompts and you’ll be done in no time!

Customize your site by adding pages, creating menus, and adding widgets to make it more engaging. WordPress has an intuitive interface that makes it easy to do all of this.

how to build a wordpress website with bluehost using the post tab.

Step 7:

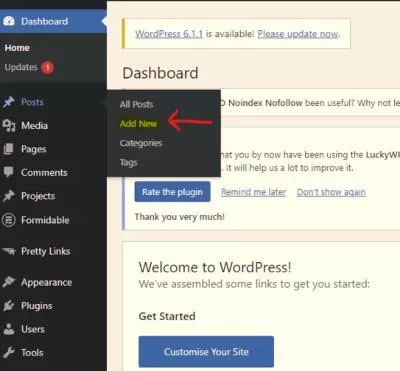
Finally, start creating content! To create your first post, go to the “posts” section of your WordPress dashboard, click on “add new,” and start writing. Format your post with headings, images, and more. And make sure you apply the best SEO practices for blogging. (More on that below.)

Once you’re happy with your post, hit the “publish” button, and it will go live on your blog!

Congratulations, you’re now the proud owner of a WordPress blog on Bluehost!

Can you see how creating a sports blog on Bluehost is super easy?

Of course, there’s a lot more you can do to customize your blog and make it your own, but these steps will give you a great starting point.

So start creating content and share your thoughts with the world!

5. Designing Your Sports Blog.

Image of a male sports blogger

Great work on setting up your blog! Now it’s time to give it some pizazz and attract readers like a moth to a flame.

A well-designed blog can make all the difference in building a loyal audience. It’s like creating a trendy hotspot where people can come to unwind. So let’s get started!

A. Choose a Killer Template

First and foremost, you gotta pick a template that’s just right for you. It’s like picking an outfit for a night out on the town.

Fortunately, WordPress has got you covered with tons of free and paid templates that can personalize your blog’s design.

Make sure to select a template that matches your brand identity and niche. You want something that looks great and is easy to navigate.

But, like all “FREE” stuff, it is limited. If you want more customization and flexibility, a premium theme like Elegant Themes comes in really handy.

Not only can you create a sports blog design of your taste, but you will also get fantastic customer support.

B. Add Your Personal Flair

Now it’s time to put your own spin on the template!

Think of it as accessorizing your outfit to express your unique style. This involves adding your own logo, selecting colors that complement your vibe, choosing fonts that are easy on the eyes, and tweaking the layout and design elements of your blog.

You can use WordPress’s customization tools or enlist the help of a web designer to create a custom design that’s tailored to your blog.

C. The Must-Have Pages

Image of a happy guy who is ready to be a sports blogging star.
In addition to having a killer design, you’ll also need to create essential pages that provide your readers with important information about your blog. These pages include:

Home Page: This is like the front porch of your blog. It should give readers a sneak peek of what they can expect to find on your blog.

About Us Page: This should dish on who you are, where you’re from, and why you’re passionate about your niche.

Privacy Policy: This page should explain how you collect and use your readers’ data and what measures you take to protect their privacy.

Terms of Use: This page should spell out the rules for using your blog, like what’s cool and what’s not.

(By the way, if you need a legal template to get your Privacy Policy and Terms of Use nailed down, check out these easy-to-use ready-made templates.)

Contact Us Page: This particular page should make it simple for readers to get in touch with you. Maybe they want to give you some feedback or ask you a question.

And guess what, you can do all this with Elegant Themes and add your personal touch and brand to your sports blog design.

By customizing your template and creating these essential pages, you’ll have a blog that’s visually stunning and user-friendly.

It’ll be a place where people want to hang out and keep coming back for more. So let your creativity run wild and make your blog shine brighter than a diamond!

6. Installing Plugins

Image of a happy sports blogger.

Whoop whoop, let’s talk about plugins!

They’re like little wizards that can help your blog perform miracles and be super cool.

With WordPress, there are thousands of plugins at your fingertips, and sports bloggers, listen up – there are some that you won’t want to miss. Check out everything you need to know to get started:

A. Why Plugins Are The Bee’s Knees

Plugins are a real game-changer, providing benefits such as:

Expanded functionality: Plugins can add a ton of features to your blog, such as those trendy social media buttons or some wicked fancy contact forms.

Improved performance: Plugins can speed up your blog’s loading times, keeping your readers engaged and happy.

Personalization: Plugins can help you to customize your blog’s design and layout, making it stand out from the crowd.

B. Essential Plugins for Sports Bloggers

If you’re a sports blogger, you need these plugins in your life:

WpRocket: This plugin is like a superhero, speeding up your blog’s performance, helping you climb the search engine rankings, and keeping your readers from bouncing away.

Updraft Plus: This plugin saves your blog’s files automatically, saving your bacon if anything goes wrong. Phew!

OptinMonster: This plugin lets you create pop-up forms that invite your readers to join your email list and join your sports-loving community.

And more.

Here’s a list of other top WordPress plugins you can use when starting a sports blog.

C. How to Install Plugins on Your Blog

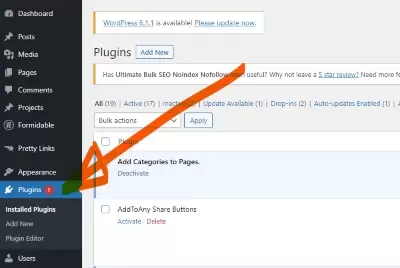
Wordpress dashboard for installing plugins for starting a sports blog.

Installing plugins is a breeze and can be done via your WordPress dashboard. Just find the plugin you want, click “Install,” and activate it once it’s done.

Be sure to only use plugins from legit sources to avoid any potential hiccups.

With plugins, you can turn your sports blog into a real gem, providing your readers with a top-notch experience. So, give it a whirl, test out some plugins, and have a blast making your sports blog the best it can be!

7. It’s The Plan.

banner image for exclusive content. Another answer as to how to monetize a WordPress blog.

“Content is what the search engines use to fulfill user intent.” – Jes Scholz, Technical SEO Analyst at DeepCrawl

This is the real deal now.

Let’s get down to business and talk about the meat and potatoes of your blog – the content!

It’s what’s going to reel in your readers and keep them coming back for more. So, what’s the deal?

How do you create great content that engages and informs your audience? Here’s what you need to know:

First things first, let’s talk about keyword research. Yeah, I know, it sounds pretty dry, but trust me – it’s crucial.

By identifying the topics and keywords your readers are searching for, you can optimize your content for search engines and get more eyes on your blog. And who doesn’t want that?

But make sure you stay away from broad keywords (topics) like sports, soccer, basketball, etc. It’s way too competitive.

Instead, go after keywords that are low-hanging fruit because you want quick wins. (like south carolina women’s basketball
yale basketball, etc).

Although these low-hanging fruit keywords have less traffic, it’s less competitive. This means you have a higher chance of getting your sports blog read and seen.

Again. Who doesn’t want that?

Now, if you want to consistently produce killer content, you need a plan. A content plan, that is.

This should include the topics and keywords you want to tackle, as well as a schedule for when you’ll publish new posts.

Speaking of which.

Here are 4 FREE Ways to Generate Sports Blogging Ideas

As a blogger, generating new and engaging sport blog ideas is key to keeping your readers interested and growing your audience.

But sometimes it can be hard to come up with fresh ideas on your own. Luckily, there are several FREE tools and resources available to help you generate ideas to start a sports blog.

So let me show you how to start a sports blog with these four tools now.

Google Keyword Planner. A nice source of ideas for sports bloggers.

1. First up is Google Keyword Planner.

It’s a free tool that can help you find relevant keywords for your blog. With it, you can see the search volume and competition for specific keywords in your niche. (You can even find potential keywords by spying on your competition.)

This will help you decide which topics to focus on based on how popular certain keywords are.

Google keyword planners search results. A free tool for sports bloggers.

Example: If you have a fitness blog and want to write about weight loss, you can use Google Keyword Planner to see which related keywords have high search volume, such as “best weight loss tips,” “fast weight loss,” “How to lose weight and keep it off” “or “how to lose weight quickly.”

Of course, the idea here is to find keywords (the low-hanging fruit ones) that are not too competitive and have good search volume.

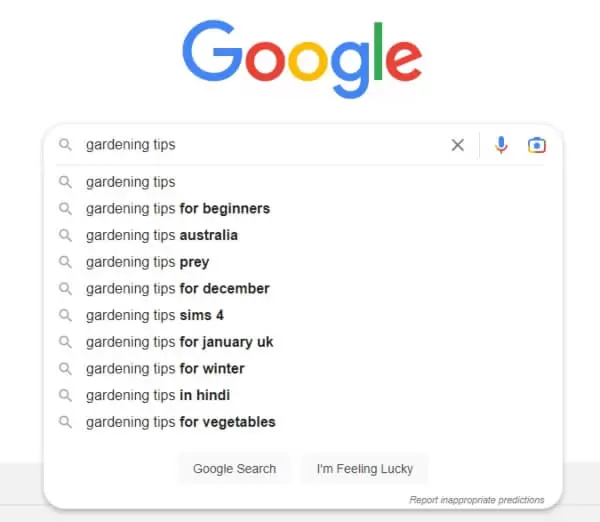
2. Next up is Google Search. This is one of the simplest ways to generate ideas for your blog is by doing a Google search on your topic or niche.

Pay attention to the autocomplete suggestions that appear as you type your search query, as these can give you an idea of what people are searching for.

Additionally, scroll down to the bottom of the search results page to see the “Searches related to…” section, which can provide you with even more ideas.

Image of people also asked. A free resource on how to start a blog.

Example: If you run a food blog and search for “easy dinner recipes,” some of the autocomplete suggestions include “easy dinner recipes for two,” and more.

Also, you can use modifiers like what, when, where, is, what does, best, and top to expand your search. Refer to this sports blogging seacr below.

Image of a Google search result. Another way to find ideas to start a blog post.

3. A third cool feature of Google that can help you generate blog ideas is the “People Also Asked” section.

It appears in the search results and provides related questions to the query that people frequently ask. You can use these questions as inspiration for your blog content.

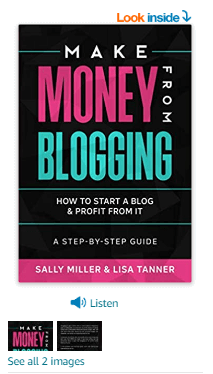
A look inside Amazon. A free tool for sports blogging ideas.

Example: If you run a travel blog and Google search using the terms “best things to do in Paris,” you’ll find under the “People Also Asked” section the following useful questions you can answer. “What should I not miss in Paris?” and “What is the coolest thing in Paria?”. Why not plug in some of your sports blogging ideas to find some great topics to discuss?

4. Lucky last, Amazon. You can browse through books in your niche and read the table of contents or chapter headings to see what topics are covered.

Another great source of sports blogging ideas includes reading customer reviews for any gaps or angles you can fill.

Image of Amazon Look Inside. A way to get ideas for a sports blog.

Example: If you run a blog on helping content creators to start a blog, you can browse through the best-selling blogging books on Amazon, and check out the ‘Look Inside’ feature of each book for blogging ideas.

Try it and you’ll see some nuggets in there to write a sports blog.

These are just some of the ideas. So why not give it a whirl to kickstart your creative mojo as a sports blogger?

Remember, consistency is key when it comes to building a successful blog. So don’t flake out on your plan!

When it comes to actually writing your posts, you have to apply the best practices for sports blogging.

8. Here’s How to Write a Sports Blog Post.

Image of a female sports blogger

Remember step 3? You know the one about putting your audience first by focusing on quality content that helps your readers.

This leads us to the pointy end of actually writing a sports blog.

First and foremost, write attention-grabbing headlines that accurately reflect the content of your post. No reader wants to click on a boring or misleading title – that’s a surefire way to turn readers off.

Next up, break up your content into bite-sized paragraphs with subheadings to make it easy on your readers’ eyes.

And write an introduction that will draw your readers in.

And, of course, include plenty of visuals like images and videos to add some pizazz to your posts.

(Real quick. Label your image file name using the main keywords and other related keywords. For example, take this post as an example, my main keyword is how to start a sports blog. Instead of some alphanumeric numbers like 34gg3432fc6676.jpg, I would name the image how-to-start-a-sports-blog.jpg.)

Last but not least, write like you’re talking to a friend. You want your readers to feel like they’re part of a community, so keep that conversational tone going strong.

By creating high-quality content that speaks to your reader’s interests, you’ll establish yourself as a bonafide authority in your niche.

So, what are you waiting for? Get cracking on that content plan and start writing your sports blog!

Side on image of a female sports blogging fan.

Here are a couple more tips to optimize your Sports Blog.

When you create a sports blog that your readers will enjoy, you have to make sure to get traffic to your blog from the search engines.

So how do you do this? It’s actually no biggie.

All you gotta do is optimize each page of your blog so that it reflects what readers would type into Google when searching for info on that topic.

This way, you’ll help Google understand what your page is all about and rank it accordingly in search results.

Here are six more key SEO pointers for your sports blog:

  1. A key element of on-page optimization is your SEO title tag. This is the title that appears in search engine results and lures people to click on your blog. To make sure it’s relevant to the article, use the main keywords that you’re targeting. But keep in mind that search engines will truncate it to around 160 characters, so be brief and straightforward.
  2. A crucial on-page SEO factor is your meta description. This is the text snippet that appears beneath your blog post in Google search results. Make sure to create a compelling meta description that accurately depicts what readers can expect from your blog. That way, you’ll have complete control over what Google thinks your post is all about.
  3. Add internal links that will direct readers to other blog posts within your sports blog. This helps keep your readers longer on the blog.
  4. Throw in a few external links that will serve as resources readers may find useful.
  5. Optimize your blog URL: before you publish your post, be sure to add the main keyword as the URL. For example, instead of your-domain-name.com/post-id, you configure it as your-domain-name.com/your-main-keyword
  6. Nail down your blog post format is vital for ranking high on search engines. Make sure your target keywords appear in the H1 (title), the first H2 as a question, the introduction, and throughout the content.

Follow these tips and you’ll improve your on-page SEO and elevate your rankings on Google.

9. Your Sports Blog Needs To Be Read.

Image of a blogger creating a sports website!

“The best source of a link is a website that is both considered authoritative and relevant to your website.” – Helen Pollitt, Lead SEO at Arrows Up

Alright, you’ve poured your heart and soul into creating killer content for your sports blog. Now what?

It’s time to get your sports blog there and start promoting it, my friend!

Without any promotion, it’s like throwing a party and no one shows up.

So, let’s talk about some effective strategies for getting the word out:

First and foremost, let’s talk about the importance of promotion.

You can have the best darn blog in the world, but if no one knows about it, what’s the point?

By promoting your content, you can attract new readers, build your brand, and establish yourself as a valuable resource in your niche.

So, how do you go about promoting your sports blog?

Here are some tried-and-true strategies to consider:

Pinterest Marketing: This is a search engine that can help drive some serious traffic to your sports blog.

What you need to do here is.

  • Start a Pinterest Business Account.
  • Knuckle down on your keyword research using Pinterest search.
  • Create keyword-rich boards (and board descriptions).
  • Whip up some eye-catching graphics using a 2:3 aspect image ratio for your Pins.
  • Add eye-catching text that is click-worthy.
  • SEO your pin titles and descriptions
  • Share your pins on Pinterest and point them to your sports blog.

If you want a step-by-step course on how to start a sports blog on Pinterest and attract high-quality traffic to your blog, I recommend you check out this course here.

Image of a laptop and camera. A blog on how to start a sports blog and get paid.

Guest Blogging: Reach out to other sports blogs in your niche and offer to write a guest post for them. This can help you expand your reach and establish yourself as an expert in your field.

Email Marketing: Create an email list and send out regular newsletters to your subscribers with links to your latest blog posts. This can help you build a loyal following and increase engagement with your readers.

Social Media: Pick one social media platform to focus on and become a master of it. When you pour your energy into one platform, you’ll get really good at it and attract your ideal audience. Once you’ve conquered one platform, you can branch out to others.

Quora and Forums: Participate in online forums and Q&A sites like Quora to answer questions related to your niche and share links to your blog posts.

Link Building Strategies: You can get back-links from broken link building, link reclamation, link partnerships, and guest post link trading.

And more.

Now, let’s talk about some best practices for successful promotion.

To make the most of your promotion efforts, keep these tips in mind:

Consistency is key: Promote your blog and engage with your readers regularly to build a loyal following over time.

Quality over quantity: Focus on producing high-quality content and promoting it effectively, rather than trying to churn out as much content as possible.

Personalize your efforts: Tailor your promotion efforts to the interests of your audience. For example, customize your email newsletters to suit the preferences of your subscribers.

By promoting your sports blog effectively, you can attract a bigger readership, build your brand, and establish yourself as a go-to authority in your field.

So don’t be shy – get out there and start promoting your sports blog!

10. Sports Blogging Wifi Money.

Image of a blogger learning how to start a sports blog and make money

By this point, you have an awesome WordPress blog, you’re generating traffic, and you might be wondering how you can make some cash from it.

Well, fret not my friend, because I’ve got some tips for you on how to start a sports blog and make money:

A. Get that Money, Honey: Ways to Monetize Your Sports Blog

Advertising: You can slap some ads on your blog using programs like Google AdSense or work directly with advertisers. This can bring in a steady flow of cash to your blog.

Affiliate Marketing: By promoting products and services that are relevant to your niche, you can earn a commission on any sales made through your unique affiliate link. Cha-ching!

Sponsored Content: Brands are always looking for ways to promote their products or services. You can work with them to create sponsored content that aligns with your niche and promotes your brand.

Digital Products: Create and sell digital products like ebooks, courses, or webinars related to your niche. People are always willing to shell out some dough for quality information.

That’s just the tip of the iceberg. You can check out this article on how bloggers make money blogging from home I posted not so long ago.

B. Making that Money Grow

Image of a blogger learning how to start a sports blog.

To maximize your earnings, you’ll need to focus on growing your readership and building a loyal following.

This can be achieved by consistently producing high-quality content, promoting your blog effectively, and engaging with your readers.

After all, the more people you can reach, the more opportunities you have to make some serious moolah.

Now that’s how to start a sports blog and get paid.

C. Don’t Mess it Up

Image of a man stresses about his sports blog.

When it comes to monetizing your sports blog, there are some common mistakes that you should avoid. These include:

Stuffing your blog with too many ads or sponsored content, can turn off readers and damage your brand.

Promoting products or services that don’t align with your niche or that you don’t genuinely believe in. Your readers will see right through that, and it can hurt your credibility.

Focusing solely on making money and neglecting the quality of your content or engagement with your readers.

Remember, you started this blog because you’re passionate about sports. Keep that passion alive and let the money come naturally.

By monetizing your sports blog effectively, you can turn your passion into a profitable business and establish yourself as a leader in your niche.

So, go ahead and explore these different monetization options to find what works best for you and your blog.

It’s time to make some money moves!

11. Email Your Sports Blog Fans.

Image of a man learning how to start a sports blog
Worship your email list. Why?

Because those email addresses you will be collecting and growing will be your most avid readers.

And having an email list of the best subscribers allows you to communicate with them whenever you want.

But. I would suggest you worry about growing your email list when you have the first nine steps sorted and settled.

I only say this because as a rookie blogger, your time and energy will be consumed with content creation and promotional stuff.

Plus the headaches that come with starting a sports blog.

That is the reality.

Build an email list when you see traffic coming in (or as soon as you can). Again, building a list of your best sports blogging fans is a must-have.

A Summary of How to Start a Sports Blog 2025

Great job! You now have the knowledge you need to transform your sports blog into a top-notch online platform that people will love to read.

So, let’s recap what we’ve learned on starting a sports blog:

First and foremost, finding a niche is crucial to attracting a specific audience and giving your blog a unique identity.

Creating a strong brand is essential to standing out from the crowd and establishing your blog’s reputation.

Using a blogging platform like WordPress can save you a lot of trouble and make your life easier.

But you’ll need a high-quality web host like Bluehost.

It will give you a fast loading speed, a very high uptime, and a simple WordPress install. (Now that’s how to start a sports blog in a click!)

Creating a sports blog with a customizable template and essential pages can give your blog a professional and polished look.

Installing the best WordPress plugins can help boost your blog’s functionality and performance, so don’t forget to do that.

Planning and creating high-quality content is the key to attracting and retaining readers. Remember, quality over quantity!

Promoting your sports blog is crucial to building a readership.

Make sure to utilize all the effective link-building strategies we’ve covered, such as Pinterest marketing, guest blogging, email marketing, social media, and forums.

Last but certainly not least, monetizing your sports blog can help turn your passion into a profitable business.

There are tons of ways to do this, including advertising, affiliate marketing, sponsored content, and digital products.

Building a successful sports blog takes time and effort, but armed with the knowledge you’ve gained from this guide, you’re well on your way to achieving your goals.

So keep creating amazing content, promoting your sports blog, and monetizing it to reach your full sports blogging potential.

Over to you now to start creating a sports website in 2025.

Disclosure: This post may contain affiliate links, which means I’ll receive a commission if you purchase through my links, at no extra cost to you. Please read full disclosure for more information.

You Might Want to Check This Out Too

Resources To Grow Your Business With

Bluehost

Bluehost is a great starting point for beginners or bloggers who want to switch to a reliable web hosting service. And it gives you the best bang for your buck - starting at $2.95 a month*.

With the entry-level hosting plan, you'll get a high up-time, reliable customer support, FREE domain name (first year) and 30 day money back guarantee.

You can sign up with Bluehost here.

WPX Hosting

It's a web-hosting service I love using.  It specializes in WordPress hosting, and depending on what package you opt for, you can host 5 or more sites on one account. The best bit is - the quick turnaround in support is top notch.

For bloggers who have an established blog, this is a fantastic option.

You can learn more about this service here.

Aweber

Building an email list of a growing audience is essential for the longevity of any business.  This autoresponder service is easy to use, and it is a great starting point for someone looking to kickstart their email campaign.

You can try their free account here.

5 Best Instagram Marketing Tools To Maximize Your Reach in 2025

5 Best Instagram Marketing Tools To Maximize Your Reach in 2025

5 Best Instagram Marketing Tools To Maximize Your Reach in 2025

Looking for the best Instagram marketing tools to take your social reach to the next level? From scheduling posts, analyzing your performance, and automating your content creation, only the best marketing tools for Instagram can save you time and help you make more informed decisions about your marketing strategy. Here, I’ve uncovered and ranked the best Instagram growth tools along with my top pick below.

Pallyy logo. One of the best Instagram marketing tools for content creators.

Best Instragram Marketing Tool

Moosend is a budget-friendly, Instagram marketing tool. You can schedule your posts, reshare UGC,  monitor engagements, track your performance and a useful IG bio link grid. Free plan with limited features available.

(By the way: this post has some affiliate links)

What is the best scheduling tool for Instagram?

Here is a quick run down on the best Instagram marketing tools to help you scale your social media presence.

  1. Pallyy – Overall, the best Instagram scheduling tool.
  2. SocialBee – The best social media scheduler.
  3. MissingLettr – Best Instagram tool for content creation on the fly.
  4. Iconosquare – Best Instagram growth tool for businesses and data geeks.
  5. PromoRepublic – Best Instagram scheduling tool for businesses and agencies.

With that said, grab a coffee or a soda, and let’s pull the curtains on the 5 best Instagram tools in 2025.

[lwptoc]

5 Best Instagram Marketing Tools Explained

1. Pallyy

A Pallyy image on the best Instagram marketing tools for content creators.

Best Instagram scheduling tool.

By far, Pallyy is the best Instagram marketing tool for entrepreneurs, content creators, and agencies.

It has everything you need to boost your Instagram presence, from scheduling your posts, analytics, competitive research, comment moderation, and a useful “link in bio” option.

And, it’s affordable for both individuals and agencies.

(A generous free plan plus an awesome premium plan.)

But before I go on about Pallyy, I must say that it is Instagram centered. The content calendar and the curation function are all built for the visual appeal of Instagram.

You’ll see why soon.

One of the standout features of Pallyy is its user-friendly scheduling calendar. It’s laid out in a grid format, making it easy to visually plan and organize your content feed.

You simply drag content from your media library onto any date and set your captions and comments. Super easy.

This is perfect for Instagram marketers who primarily share visual content such as photographs and videos.

Can you see how its scheduling workflow is super useful for Instagram users?

Another factor that makes it the best Instagram marketing tool is the Explore menu.

(I like to point out it is only available for Instagram.)

You can use it to find popular posts and hashtags, and then repost them to your Instagram feed.

How’s that for content curation? Easy, right?

Another useful one is the first comment.

This allows you to post a caption and then schedule the first comment in the comments section. This means, you can add any hashtags separate from your post.

Plus, you can even see a thumbnail preview of your scheduled post in the calendar cell. Very convenient.

With that said.

Pallyy also offers bulk uploads, the best time to post for maximum engagement, Canva integration, team collaboration tools, and even provides in-depth analytics.

Plus, you can manage comments and reply directly to your audience from within Pallyy and even search for user-generated content to re-share.

Here are the notable features of this Instagram marketing tool:

  • Scheduling: Plan your Instagram feed visually and schedule posts with captions and first comments. You can also post to Facebook, Twitter, LinkedIn, Google My Business, Pinterest, and Tiktok.
  • Bulk uploads: Easily upload multiple images and edit them with flyers or preset sizing options.
  • Optimal posting times: Get recommended times for maximum engagement on your posts.
  • Canva integration: Create and edit images using Canva and schedule them with Pallyy.
  • Analytics: Track your and your competitor’s engagement rates, follower count, and top-performing posts and stories.
  • Social Media Inbox: Manage comments and reply directly to your audience from within Pallyy.
  • User-generated content search: Find the best content to re-share with Pallyy’s Explore feature.
  • Link in bio: Create a landing page with multiple clickable links for your Instagram profile.
  • Competitive research: Monitor your competitors and gain insights into their activity.
  • Comment moderation: Filter and manage comments on your posts.

With all the said features and functions, this is why Pallyy is one of the best Instagram tools for growth. If not, the best.

Pricing: Free plan available (for one social set). If you want to unlock more features, a Premium Plan is available from $15 per month per social set.

2. SocialBee

A banner of Socialbee. A marketing tool for Instagram platform.

Best tool for scheduling social media posts.

SocialBee is a fantastic Instagram marketing tool for small businesses, agencies, and influencers. Actually, of all the Instagram marketing tools, SocialBee is truly an all-in-one social media scheduler.

You see. Not only does SocialBee allow you to manage your Instagram account, but it also helps you with your Facebook, TikTok, Twitter, LinkedIn, YouTube, Pinterest, and Google Business Profile.

As well, you can use SocialBee to organize and schedule your content, share it across platforms, and track performance.

One of the standout features that I like most is its innovative scheduling options.

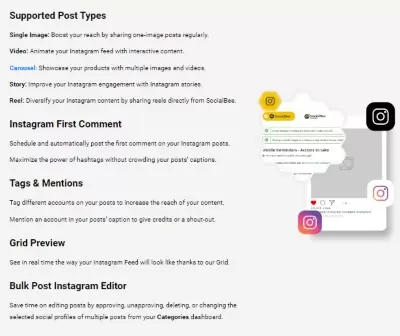
For example, the content Categories feature allows you to create different categories for different kinds of posts, which can help you to get a nice balanced of content to post.

You can also edit all posts in a category at once using the bulk editor, saving you time.

To top it off, SocialBee’s recycling feature allows you to reuse your top-performing (and evergreen content) posts by creating new variations of your posts. And then rescheduling them for more reach and value.

And, for time-sensitive posts, you can set expiration dates for all your posts or set them to expire after a certain number of shares.

Here are the notable features of this Instagram scheduling tool:

  • Cross-platform management for Instagram, Facebook, TikTok, Twitter, YouTube, Pinterest, LinkedIn, and Google Business Profile.
  • Awesome scheduling features, giving you the ability to create content categories and edit your posts in bulk.
  • Recycling of top-performing content with the ability to post new variations and reschedule.
  • Expiration dates for time-sensitive posts and the ability to set expiration after a certain number of shares.
  • Instagram analytics and reporting features.
  • Custom short URLs and URL tracking.

Pricing: The Small Business Plan starts at $19/month (for five social profiles). 14-day free trial available.

3. MissingLettr.

An image of Missinglettr. One of the best Instagram tools for marketing

Best Instagram tool for content curation and bringing new life to your blog posts .

MissingLettr is the fourth best Instagram marketing tool on our best-of list.

Using this tool, you can save time on content creation and publishing for Instagram.

Here’s why.

Using the Curate feature, you can pull content from blogs and other sources, and then turn it into social content for Instagram and so on.

Even better, with the built-in social media calendar, you can easily schedule your Instagram posts in advance.

How’s that for time-saving?

But there’s one more. The Drip Campaigns.

Using its own AI, it can bring new life to all your new and old blog posts.

What it does is, it will again find content from your blog, and combine it with the right hashtags and images for an Instagram content for your review before it is scheduled out.

The nice thing here is.

With every new blog post, Missinglettr will automatically turn it into social content.

And to take it to another level, it even finds your best-performing Instagram (and other social platforms) posts and has it scheduled out at the best times.

With so many plugin tools for creating Instagram posts, Missinglette deserves to be on our list of the best Instagram marketing tools!

But that’s not all!

Missinglettr also comes with powerful analytics to track all of your Instagram metrics, so you can see the impact of your efforts.

If you’re feeling overwhelmed by the time you spend on Instagram, Missinglettr’s automation features can help you post consistent, regular content without taking up too much of your time.

This nimble Instagram marketing tool is perfect for busy brands and businesses that want to maintain a strong Instagram presence.

Here are the notable features of this Instagram marketing software:

  • Social media calendar for scheduling Instagram posts, including Facebook, Twitter, and LinkedIn.
  • Analytics feature to track all of your Instagram metrics so you can data-driven decisions.
  • Create and curate new posts with the Curate feature that automatically pulls information from blogs, articles, and other content to create new posts, giving you new ideas for your Instagram.
  • Monitor your brand mentions and respond quickly using the conversation feature.
  • Save time by automating posts with the scheduler, set expiration dates for time-sensitive posts, and recycle top-performing content by creating new variations of your posts.

Overall, Missinglettr is the perfect tool for brands and businesses that want to maintain an Instagram presence but don’t have a ton of time to devote to it. Making it one of the top-rated Instagram tools for marketing.

Pricing: The Starter Plan starts at $9/month (for one social profile). 14-day free trial available.

4. Iconosquare

A snip of Iconosquare. Rated one of the best tools for Instagram.

Best Instagram marketing tool for businesses and data-driven lovers.

Iconosquare is another powerful Instagram marketing tool that can help achieve your marketing goals.

It stands out for its in-depth analytics, publishing, and monitoring features.

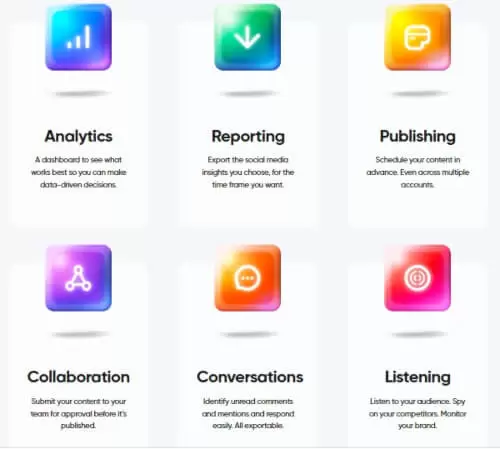
With Iconosquare, you’ll have access to a social scheduler and social listening tools, but what sets it apart is its analytics.

For the number geeks, you’ll have access to a wealth of data that will allow you to really understand what’s working and what’s not in your campaigns.

You’ll be able to see key performance indicators like follower growth, engagement rates, reach, and impressions in easy-to-read graphs.

Plus, you can compare your performance against industry benchmarks for over 100 different industries to see how you stack up.

And the Conversations feature allows you to see how your brand or competitors are being mentioned across Instagram, and respond to any comments.

Seriously, that’s so useful for keeping track of your social performance.

Iconosquare can help you identify the weak points of your social marketing campaigns.

Another worth mention is the Listening section.

This is where you can use it as a measuring stick and compare your social media performance against fellow peers in your niche.

This then allows you to align your marketing strategy, using methods that have worked for others in your niche on both good ole Facebook and Instagram.

Here are the notable features of this Instagram marketing software:

  • Cross-platform management for Instagram, Facebook, TikTok, Twitter, Pinterest, and LinkedIn.
  • In-depth analytics and data visualization to track key performance indicators and compare performance against industry benchmarks.
  • Compare organic vs promoted posts to see the impact of promotional campaigns.
  • Mentions section: This is a conversations feature for sorting and responding to mentions across Instagram.
  • Listening section: gives you the ability to measure against the industry benchmarks for over 100 different industries for comparison of social performance.

Pricing: The Pro Plan starts at $59/month (for three social profiles and two team members). 14-day free trial available.

5. PromoRepublic.

A n image of PromoRepublic. One of the best Instagram marketing tools.

Best Instagram scheduling tool for big teams.

PromoRepublic is another excellent marketing tool for Instagram. Using this software, you can post to Instagram business accounts and even to your personal ones too.

Not only does it offer powerful automation features to help streamline your workflows. It also comes with a wide variety of done-for-you content templates to create high-quality posts on the fly.

And the nice thing is. You can use the templates for different industries and niches.

For example, there are templates for food, sports, travel, and many more to choose from for your next post idea.

Furthermore, it has a cool graphic design editor to help you design eye-catching posts.

A note about the Calendar tool.

The AI in PromoRepublic looks at the posts you’ve already published on all your connected social media platforms and creates a content schedule for you.

The labels you see (Blog Posts, Promotional, Educational, Engaging, Motivational & Fun, and Other) are content types that the AI software uses to automatically categorize your posts.

This makes it easy for you to keep track of your content and stay organized.

Overall, this is Instagram marketing tool is suited for businesses and agencies looking for a powerful and easy-to-use social media management tool.

With its automation features, done-for-you content templates, and reputation management tool, it can help you save time and streamline your social media efforts.

Here are the notable features of this Instagram marketing tool:

  • Cross-platform management for Instagram, Facebook, TikTok, Twitter, Pinterest, and LinkedIn.
  • Automatic reposting: PromoRepublic can automatically re-queue your top-performing content (evergreen ones) for a later date, ensuring that you’re always maximizing engagement.
  • Done-for-you content templates: With over 100,000 templates to choose from, you’ll never have to start from scratch when creating your social media posts.
  • Efficient workflows: Share content with different team members or clients for quick approvals and avoid bottlenecks.
  • Social Media Inbox: Available for Facebook And Instagram, you can manage comments and messages.
  • Analytics and reporting: Track your social media performance and get insights into what’s working and what’s not.
  • Reputation management: Manage and respond to customer messages, ratings, and more in one centralized location.

Although it is in the high price range, it is still one of the best Instagram growth tools for agencies and businesses.

Pricing: The Small Business Plan starts at $49/month (for ten social profiles). 14-day free trial available.

Instagram Marketing Tool – FAQ

Pinterest pin on the best Instagram Scheduler

Which Instagram tool is best?

Here is a run down of the best Instagram tools in 2025.

  1. Pallyy – The best Instagram tool for marketers ad agencies.
  2. SocialBee – The best social media scheduler.
  3. MissingLettr – Best Instagram marketing tool for content creation.
  4. Iconosquare – Best Instagram scheduling tool for entrepreneurs and business who wants reports and numers.
  5. PromoRepublic – Best Instagram scheduler for big teams

Is Instagram an effective marketing tool?

Yes, Instagram is a very effective marketing tool for businesses and entrepreneurs. Here are three reasons why:

  1. It has a large audience with well over 1 billion monthly active users. This is a massive audience for you to tap into.
  2. Instagram is a visual platform, which means you can share pictures and videos to showcase your products or services in a creative and engaging way.
  3. Instagram has a high level of user engagement, which means that people are more likely to interact (giving opinions and feedback) with your content. And because of it, people tend to remember the content better than other social media platforms.

If you want to build brand awareness, generate leads and sales, and scale your business online, Instagram is a must-have. (Social marketing is one of the best practices to generating traffic to your blog.)

Summary of The The Best Instagram Marketing Tools

Blog banner post on the best Instagram marketing tools
There you have it. 5 of the best Instagram marketing tools for 2025.

And as a recap, our top gong for the best Instagram tools for marketing is.

Pallyy.

Because it offers a wide range of features that will help you to automate your Instagram marketing efforts.

One of the standout features is the ability to schedule posts and stories, which will save you a lot of time and effort.

Better yet. You can even share and curate user-generated content with your audience.

Also, Pallyy’s advanced analytics and monitoring tools will give you a deep understanding of your audience and how your content is performing.

Which helps you make data-driven decisions to optimize your Instagram marketing strategy.

Overall, Pallyy is an excellent choice for anyone looking to improve their social reach.

So why not give this Instagram marketing tool a test drive and see the potential.

You Might Want to Check This Out Too

Want Better Alternatives to Hootsuite? – Here Are The Best Social Media Scheduling Tools to Help You Meet Your Business Goals

Looking For The Best Marketing Automation Software To Take Your Business To The Next Level? – Here Are The Top Rated Marketing Systems For Social, Email & CRM

Disclosure: This post may contain affiliate links, which means I’ll receive a commission if you purchase through my links, at no extra cost to you. Please read full disclosure for more information.

Resources To Grow Your Business With

Bluehost

Bluehost is a great starting point for beginners or bloggers who want to switch to a reliable web hosting service. And it gives you the best bang for your buck – starting at $2.95 a month*.

With the entry-level hosting plan, you’ll get a free domain name for one year, free SSL, free CDN, reliable customer support, and 30 day money back guarantee.

You can sign up with Bluehost here.

WPX Hosting

It’s a web-hosting service I love using.  It specializes in WordPress hosting, and depending on what package you opt for, you can host 5 or more sites on one account. The best bit is – the quick turnaround in support is top notch.

For bloggers who have an established blog, this is a fantastic option.

You can learn more about this service here.

Aweber

Building an email list of a growing audience is essential for the longevity of any business.  This autoresponder service is easy to use, and it is a great starting point for someone looking to kickstart their email campaign. You can try their free account here.

5 Best Email Drip Campaign Software For Entrepreneurs 2025

5 Best Email Drip Campaign Software For Entrepreneurs 2025

5 Best Email Drip Campaign Software For Entrepreneurs 2025

Looking for the best email drip campaign software that will automate your marketing system and allow you to get the right information to the right people? Here, I’ve uncovered and ranked the best email drip campaign software that’s perfect for creating effective email drip campaigns. But, before you go on, this is my top pick for the best email marketing software.

Moosend logo - rate the best marketing automation software for small businesses.

Best Email Drip Campaign Software

Moosend is a budget-friendly, all-round drip email marketing app. It is easy to use. It has great customer support and it has powerful segment features for email drip campaigns.

(By the way: this post has some affiliate links)

Six Important Things To Consider in an Email Drip Campaign Software

Before we dive in, let’s take a step back and consider the six essential things you should look for in a reliable drip email campaign software.

  1. Personalization: You got to get a tad personal by addressing your subscribers by their first name. So instead of ‘Hi there’ or ‘Hey friend’, why not take it a step further by saying ‘Hey Jason’.
    2. Visual Automation Workflow: This allows you to create an automated email campaign by creating, scheduling, and triggering your emails, as well as tagging your subscribers.
    3. Segmentation: This is a big key to email marketing. As marketers, you want to be able to serve your audiences’ needs and deliver them the right information they want to read.
    4. Analytics: This allows you to measure the success of your email campaigns.
    5. Integrations: App integrations and APIs are the keys to enabling marketers to join their email service provider with other systems, such as CRM or point-of-sale software so that they can send out laser-targeted messages.
    6. Pricing: Is the plan based on the number of subscribers, the number of emails you send, or the type of plan needed for an email drip campaign?

Now that I’ve covered the essential stuff, I want to mention this.

Drip email campaigns (aka automated email campaigns) are a must-have in every email marketing software. You want to be able to automate most of the email sequences, like …

  • Run and schedule your email campaigns using triggers.
  • Tag and segment your subscribers.
  • Monitor the performance of every email sent.

You see.

The most basic email marketing software allows you to configure a drip campaign by setting a trigger (for example, when someone subscribes to your list). Once it is triggered, the emails are sequentially released based on the delays between each email.

With the more advanced email marketing software, you can analyze your audience with advanced analytics and even connect your campaigns to other channels such as SMS, WhatsApp, or good ole Facebook Messenger.

With that said, grab your favorite drink, and let’s uncover the 5 best email drip campaign software in 2025.

[lwptoc]

What is the best email automation software for sending drip email campaigns?

Pinterest pin on the best email drip campaign software and tools

Here are my top picks for the best email marketing app category.

  1. Moosend
  2. ConvertKit
  3. Hubspot
  4. GetRepsonse
  5. Omnisend

Note that all the above email drip campaign software has Integrations for CRM, lead generation, eCommerce, and more.

And if you’re wondering why I only have five email drip marketing tools?

Here are my two reasons.

One. I don’t want to overwhelm you with so many options that it will leave you even more confused.

It’s like going into a Chinese restaurant and you’ve got this 10-page A3-sized menu loaded with 200 meal options. And 20 minutes later, you still don’t know what to have.

In my opinion, less is best.

Two. I’m here to help. So if I hear other email marketing tools making a splash, I’ll be the deer in the headlights. I’ll test it and put it through the grinder.

And if it passes the mustard, I’ll update it to my list of the best email drip campaign software guide here.

So let’s crack on.

1. Moosend.

Moosend screenshot. It is the best email drip campaign software.

Best email drip campaign software.

Moosend is an all-in-one email marketing platform that makes it easy to design, send, and track your campaigns. With powerful and intuitive tools, you can create segmented, personalized newsletters that will drive more opens and clicks.

You also have a CRM system, a landing page builder, and automated campaigns.

The big feature is the ‘automation workflows’.

This is where you can create an automated email sequence (drip email campaign) triggered by the conditions and events you set.

For example, you can set up a workflow to send emails when someone joins your list, or when they purchase something from your website.

This means you don’t have to manually send out emails every time something happens. It is all automated.

And when you have a segmented audience, you can target them with content that serves their needs. And if you wish, delivered at optimal times.

The drag-and-drop newsletter editor makes it easy to create stunning emails with multimedia elements and interactive blocks.

You can split up your content into rows and columns using ‘layouts’, add in images, videos, buttons, and more. Plus, with the product block, you can quickly recommend products and link to pages in your eCommerce store.

To help craft attention-grabbing subject lines, Moosend has an AI-powered subject line generator, Refine. It will analyze and suggest improvements to help maximize opens and clicks.

Other notable features of this email drip campaign software include:

  • ‘Abandoned Cart’ – This is when a prospect has added a product to a cart and they skip the buy button. If they don’t make a purchase, you can create a trigger to follow up with a reminder.
  • ‘VIP Offer’ – Say when you get a customer and if he or she spends above a target limit, you can email a VIP offer like a discount. Which is a smart way to build loyal customers.

(Real quick. If you want more subscribers to open your email, focus on the subject line.)

Plus, the best part is the pricing. It is very affordable.

Pricing: Plans start at $9/month for up to 500 subscribers. And as your subscriber list grows, so does the cost.

If you’re ready to take the plunge and see what Moosend can do for you, take advantage of the 30-day free trial. You won’t regret it!


Again, Moosend is the best email drip software.

2. ConvertKit.

Convertkit dashboard. Rated one of the best drip email campaign software.

Best email drip campaign software for solopreneurs and creators.

When it comes to creating the best email drip campaign software, there’s no better option than ConvertKit. With a suite of tools, you can quickly set up your email automation with plain, simple text emails.

I just like to point out here. When it comes to email deliverability, plain-text emails normally outperform image-heavy ones.

And with its ‘Visual Automations‘, you can easily line up your emails based on time delays and filters for an email sequence.

You can then use these automated email sequences to deliver an online course or a nurture email sequence to build a relationship of trust with your subscribers.

So all it takes is a few steps (and planning).

You write your emails, set the rules (time, list exclusion, etc), and then hit save. Voila.

To set the time when the email should go out, check under the tab ‘When to Send’ and then choose the interval. Boom.

You have an email drip campaign ready to go.

For content creators and bloggers who want more of the fancy look to their emails.

ConvertKit also gives you access to 28 drip email templates.

You can use them to promote your work on social media, introduce yourself to subscribers with a podcast, or even offer a free chapter of your new book.

Plus, you can use the ‘if this, then that’ to create conditional rules. This helps to automate and segment your list.

Like, when subscribers click on a link in a sales channel, it will trigger an email sequence.

For those wanting to make sales, ConvertKit Commerce integrates with Stripe so you can sell products from emails.

You’ll also be able to set up products and subscriptions, as well as add a tip jar if you have generous followers.

(You can even integrate with Zapier.)

And because Converkit is designed for bloggers, content creators, and solopreneurs in mind, the reports of your email sequence performance are plain vanilla flavor.

The reporting dashboard gives you a nice overview of metrics like open rate, click rate, subscribers, and unsubscribers without overwhelming you with complex data (heatmap, geography, etc).

I like it when I get numbers that matter and are easy to analyze.

Pricing: The Plans start at $9 per month for up to 300 subscribers. Again, as your subscriber list grows, you’ll pay more.

ConvertKit offers a free plan for users with less than 1,000 subscribers, so you can get started without spending a dime. To use the email drip campaign, you’ll need to pay to play.

3. HubSpot.

Hubspot email drip campaign software

Best email drip campaign software with CRM.

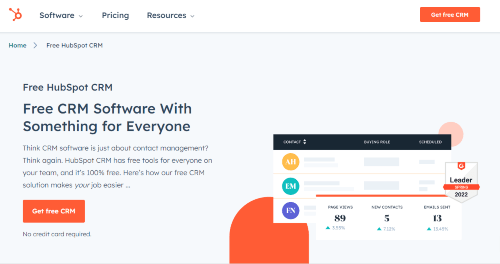
HubSpot is a monster email marketing software. It is the Rolls Royce. And it is not cheap.

Like any CRM with email marketing, this email marketing software will store customer data such as user behavior, purchase history, website interaction, and more.

In a way, it turns you into this Peeping Tom who stalks every movement of your target. Your readers. But in a far less creepy way.

With such insight into your prospect and customer profile, you will improve the marketing process, deliverability, and service.

The intuitive interface makes personalizing emails easy, while free form and popup builders allow you to capture new contacts quickly.

Plus, you can create high-converting landing pages.

Now. If you want to level up your customer service, you can add live chat or chatbots to your website.

How’s that for service?

Circling back to the earlier point.

You can create custom autoresponders and drip email sequences based on any of the contact information within the HubSpot CRM.

This means you can use triggers such as someone viewing a product page or filling out a lead ad form to initiate the drip email campaign.

And when you do this, you can target the right people with the information they want to read.

The big plus. The automating processes help you or your team manage contacts and leads without any manual work.

Pricing: You can try out HubSpot’s free plan to get started. It includes unlimited subscribers, a CRM (all features are 100% free), customizable forms and popups, landing pages, ad management, live chat, and bots, as well as up to 2,000 emails per month.

If you want more advanced features like drip email automation, social media, a/b testing, and more, the CRM Suite Start plan starts at $45 per month for 1000 marketing contacts.

Pricing will vary depending on how many contacts you wish to have and which tools you need access to.

4. GetResponse.

Screenshot of Getresponse. One of the best email drip campaign software rated.

Best email drip software with Newsletter functionality.

GetResponse is the best email drip campaign software for content creators, bloggers, and entrepreneurs. With its powerful drag-and-drop newsletter builder and free image library, you can easily create beautiful newsletters that turn leads into customers.

You can also use the pre-made workflow templates to save time or even build a custom workflow from scratch in the visual workflow builder.

For planning emails, you can use either the list or calendar view, and to create them you can use their simple drag-and-drop editor or one of their ready-to-customize templates.

GetResponse also offers an extensive reports dashboard so that you can keep track of open rates, click rates, goals, bounce, unsubscribe, and spam complaint ratios.

But the biggest attraction is the funnel builder.

When you use it, you can create your lead magnets, landing pages, and email sequences and then build your funnel so you can capture those important leads and nurture them to loyal customers.

Using the platform, you can quickly put together funnels that contain your lead magnets, designated landing pages, and email sequences so you can generate those red-hot leads, lead with value, and build trust.

Pricing: The Plans start at $15.58 per month for up to 1000 subscribers. Again, as your subscriber list grows, you’ll pay more. But, you’ll get more features.

If you want to give it a whirl, this email marketing software offers a free account for up to 500 subscribers. To use the email drip campaign, you’ll need to upgrade to a paid plan.

5. Omnisend.

Screenshot of Omnisend. Best email drip campaign software for online stores.

Best email drip campaign software for eCommerce players.

Omnisend is the best email newsletter software for eCommerce stores. With its powerful integration capabilities, you can quickly create highly-targeted automated email drip campaigns.

Take this example.

If you want more leads from your blog or website, you can use Omnisend to create a fun wheel of fortune game.

Just like the tv game show, each slice of the wheel has one offer to be won. Like discounts, free shipping, and more.

In return for a spin of the wheel, the user leaves you their email address.

This helps to grow your email list and increase your chances of turning a lead into a customer.

Plus, there are plenty of templates and a visual builder that makes setting up these campaigns fast and easy.

To take it to the next level, Omnisend tracks data from your eCommerce platform. This helps to identify customers who for whatever reason have added products to their cart but didn’t make a purchase.

Using the data, you can send them a friendly reminder or offer an additional discount, or even offer similar product(s) suggestions to go with the cart.

And its advanced reporting features give you real-time insights into the performance of your campaigns so that you can best segment your audience according to their lifecycle stage – ranging from new customers to loyal fans.

On top of all that, you also get powerful SMS and web push notification tools for sending targeted messages across multiple channels.

Plus, by connecting Omnisend with Zapier, you can keep your contact list up to date and delight customers without extra work.

With Omnisend, you have all the best features at hand to create the best email drip campaign for your online store.

Ominisend is the best email drip software for online retailers.

Pricing: The Plans start at $16 per month for up to 500 subscribers and 6000 emails per month. Again, as your subscriber list grows, you’ll pay more.

If you want to give it a whirl, this email drip campaign software offers a free account for up to 250 subscribers and 500 emails per month. And you can use the email drip campaign.

Email Drip Campaign Software – FAQ

email drip campaign software FAQs

Which apps can be used to create an email drip campaign?

The best apps you can use to create an email drip campaign are:

  1. Moosend – Overall, the Best drip app for email marketing.
  2. Convertkit – Best drip email campaign software for content creators, bloggers, and entrepreneurs.
  3. Hubspot – Best email drip marketing software with CRM.
  4. GetResponse – Best email drip campaign software for newsletter marketing.
  5. Omnisend – Best email drip software for online stores.

What is the best email automation software?

Below is a list of my top picks for the best email marketing software. Especially, for email drip campaigns in 2025.

  1. The best email automation software overall is Moosend.
  2. The best drip campaign software for content creators and solopreneurs.
  3. The best all-in-one drip email campaign software is Hubspot.
  4. The best email marketing service for newsletter campaigns is GetResponse.
  5. The best email drip campaign software for online retailers is Omnisend.

Summary of The The Best Email Drip Campaign Software

Blog post banner on the best email drip campaign software
That’s it. These are the best email drip campaign software to help level up your email marketing game.

They are the cream of the crop for content creators, bloggers, and entrepreneurs who want to grow a list of the very best prospects and customers.

And if you are still unsure which email automation software is the best fit, then check out this top pick.

Moosend.

It is the best email drip campaign software for content creators, bloggers, and marketers. Because it offers a comprehensive suite of email drip automation features that make it very easy to create automated campaigns that convert more leads into customers.

With Moosend, you can quickly build beautiful emails with drag-and-drop templates and track real-time performance metrics.

It also integrates easily with popular platforms such as Zapier, Thrive Cart, WooCommerce, and Salesforce so you can collect valuable data from your blog.

And then use them in your custom marketing campaigns. Powerful.

Plus, its freaking dashboard is user-friendly.

For only $9 a month, you can’t go wrong.

So get wild and be the Big Brother of email marketing that adds value to people’s life.

You Might Want to Check This Out Too

Disclosure: This post may contain affiliate links, which means I’ll receive a commission if you purchase through my links, at no extra cost to you. Please read full disclosure for more information.

Resources To Grow Your Business With

Bluehost

Bluehost is a great starting point for beginners or bloggers who want to switch to a reliable web hosting service. And it gives you the best bang for your buck – starting at $2.95 a month*.

With the entry-level hosting plan, you’ll get a free domain name for one year, free SSL, free CDN, reliable customer support, and 30 day money back guarantee.

You can sign up with Bluehost here.

WPX Hosting

It’s a web-hosting service I love using.  It specializes in WordPress hosting, and depending on what package you opt for, you can host 5 or more sites on one account. The best bit is – the quick turnaround in support is top notch.

For bloggers who have an established blog, this is a fantastic option.

You can learn more about this service here.

Aweber

Building an email list of a growing audience is essential for the longevity of any business.  This autoresponder service is easy to use, and it is a great starting point for someone looking to kickstart their email campaign. You can try their free account here.

5 Best Hootsuite Alternatives To Level Up Your Social Media 2025

5 Best Hootsuite Alternatives To Level Up Your Social Media 2025

5 Best Hootsuite Alternatives To Level Up Your Social Media 2025

Looking for the best Hootsuite alternatives so you can achieve your social media goals?

From organizing your content to analyzing its reach, the most powerful social media management tools can help you accomplish even the loftiest of objectives smoothly.

Here, I’ve uncovered and ranked the best alternatives to Hootsuite, along with my top pick below.

SocialBee logo for the software marketing automation software for small business.

Best Hootsuite Alternative

SocialBee is a fantastic social media scheduling tool for bloggers, content creators, small businesses and agencies.

(By the way: this post has some affiliate links)

Why Should You Consider Alternatives to Hootsuite in 2025?

Once upon a time, Hootsuite was a trailblazer in providing an effective social media management platform amongst a small handful of options.

Fast forward to today, there are over 290 social media management schedulers (check out this post by G2).

Don’t get me wrong – Hootsuite is still a reliable social media management tool.

Yet, there are newer and more powerful options available.

And the big issue for me. It’s way too pricy for me.

Hootsuite’s pricing model is not cheap for bloggers, content creators, and small businesses.

If you’re just starting out, it is not worth it.

Plus, it’s not the easiest scheduler to learn.

So there are likely other cheaper Hootsuite alternatives that are just as reliable and more suited to your budget and individual requirements.

Although Hootsuite is an excellent tool for managing multiple social media accounts, it is not as flexible.

With that said, let’s look at the best Hootsuite Alternatives.

(By the way: this post has some affiliate links)

[lwptoc]

Best Hootsuite Alternatives Unpacked

Pinterest pin on the best Hootsuite alternatives.
I think this is a 15 to 20-minute read.

So grab your favorite drink and snack, and then let me go over the programs similar to Hootsuite.

When you’re good to go, read on.

But first, below are the best alternatives for Hootsuite in 2025.

  1. SocialBee – The best Hootsuite alternative.
  2. CoSchedule
  3. MissingLettr
  4. Social Pilot
  5. Sendible

1. SocialBee.

SocialBee homepage - one of the best marketing automation tools for small businesses

Best Alternative to Hootsuite.

Best for: Solopreneurs, bloggers, and small teams.

Supported Platforms: Meta, Twitter, Instagram, LinkedIn, Pinterest, TikTok, YouTube, Google Business Profile.

Key features of This Social Media Scheduler:

  • Very, very affordable.
  • Social media scheduling.
  • Social media calendar.
  • Share curated content.
  • Content categories.
  • Content recycling of evergreen posts.
  • Expire posts.
  • Customizable posts for individual social.
  • A team collaboration tool.
  • Canva integration.
  • Analytics – You can identify top-performing posts and categories, the best times to post, engagement levels, and social media activity.

SocialBee is a social media management tool focused on content management by streamlining the content creation process whilst allowing marketers and teams to collaborate efficiently.

But first.

I must say that of all the social cross posting tools, SocialBee, is the most affordable.

And when you compare the pricing and features with other automated social media tools, you will get a big bang for your money.

So, if you’re a solopreneur, blogger, or small business, you have to seriously consider SocialBee.

(For bigger teams, the Agency plans are available too.)

Moving on.

This Hootsuite alternative operates on a category-based system. This allows you to assign each post to a specific category and then schedule different types of posts using the categories set.

So think of it as like creating categories for a blog. When you create a blog post, you would choose which category your post belongs to.

If it was a post about social media scheduling tools, you’ll have a category for marketing automation tools.

If it was a post about how to set up a blog, you’ll have a category for blogging.

With SocialBee, you can do just that. But this time, you can have different categories, and in each category, you will have social media postings related to that category.

What this means is. You can schedule when the content is to go out live from each category.

What’s more.

In the category setting, you have the option to select your evergreen post and have it re-queued automatically after the post is published.

SocialBee also makes it possible to bulk-edit your content for maximum efficiency.

Plus, with SocialBee’s post-recycling feature, you can republish posts from your library to different platforms or to the same platform at different times.

You also can have expired posts. This means you can limit it to the number of times a post can be shared or set a deadline before it expires.

How awesome is that!

Here’s another nice touch. When you are out of scheduled posts or if something goes poop, SocialBee will notify you.

Now for Twitter nerds, you have to love this one.

SocialBee gives you the ability to research your Twitter competitors’ followers and makes suggestions for good ones. You can then reach out to them to build a new active audience.

Yes, I know you can do this without SocialBee. But think of the time you will save using an automated social tool that does this for you.

And here’s another notable feature.

Most social media management tools only work with bitly (or use their shorteners), but SocialBee works with a much wider variety of link shorteners. Some popular shorteners include Rocketlink, Replug, Switchy, and Rebrandly.

It also provides a range of reporting, analytics, and collaboration features to help you optimize your campaigns and take them to the next level.

And when you compare the pricing to Hootsuite, Sprout Social, and Sendible, SocialBee’s plans are reasonable and well within the budget of small-medium businesses or large digital agencies.

Overall, when it comes to social media automation tools SocialBee should be your top choice!

Pros:

  • Very affordable plans.
  • The re-queue feature on this platform is one of the best ones out there.
  • Content curation tools that help you save time and be more productive.
  • Content recycling and RSS feed post-generation are just a few of the sophisticated features.
  • Within the content calendar, you can preview your scheduled posts.
  • Organize your posts by categories, customize them for each social media platform, and then post them on all of your socials simultaneously.
  • The Canva integration inside SocialBee’s post editor is easy to use and helps you create stunning visuals for your posts.

Cons:

  • No social media inbox.
  • No social media listening tool.
  • The learning curve can be high for some people.
  • The app is not suited for enterprises since it is only web-based.

SocialBee Pricing: The Bootstrap plan costs $19 per month, the Accelerate plan costs $39 per month, and the Pro plan is priced at $79 per month. (Agency plan is available from $79 a month)

All plans include a 14 Day free trial.

2. CoSchedule

CoSchedule banner - one of the Hootsuite alternatives for social posting

Best Hootsuite alternative for professional marketers, marketing teams, and marketing agencies.

Supported platforms: Meta, Twitter, LinkedIn, Instagram, and Pinterest.

Key features of This Social Media Scheduler:

  • Social media scheduling.
  • Social media calendar.
  • Bulk scheduler.
  • Reposting.
  • Task workflow templates.
  • Team and client management collaboration tool.
  • Analytics – social engagement reports, social campaign reports, identify top-performing messages.

If you want efficiency then Coschedule offers tools with features that can help make your life easier.

Whether you’re a solopreneur or part of an agency, you can keep track of all of your projects and manage clients’ needs from one central place.

Now, this next feature should interest agencies or small teams.

You can use drag-and-drop calendars to collaborate and manage the workflow easily so your team members can see what is coming up next.

And you can even implement approval procedures.

Another neat feature of this social media scheduling tool is the WordPress integration. This means whenever you publish a post, you can push the right content to your preferred social media accounts.

This means, within the platform, you can write content for both your WordPress blog and all your social posts.

One more thing.

You can even ‘Requeue’ and reuse past blog posts for more reach.

This allows you to easily reschedule your best content for more reach.

Moving on to the next handy feature.

CoSchedule also offers email marketing integrations and analytics so you can stay on top of your marketing efforts.

We all know how important email marketing is. Right?

Plus, their ‘Top Content Report’ provides insight into the social engagement of every campaign you send out, making it easy to adjust each post whenever necessary.

Pros

  • Both the dashboard and calendar are centralized.
  • You can easily monitor your team’s progress and what they are working on at any given moment. Custom statuses to workflows can be applied based on the team’s workflow.
  • Collaboration for teams and clients is straightforward.
  • Project management tools.
  • Multiple handy features and functions.
  • If you miss out on the social media posting schedule, then it automatically fills in the gap with your top-performing posts.

Cons

  • Compared to any other cross posting scheduling tool in the market, it is expensive. Especially when it does not have features like social listening and monitoring.
  • No tool integrations to streamline the process.
  • Although ReQueue is terrific, it does have some limits. You can only queue your posts two times.
  • It is slow to load.

CoScedule Pricing: PRO Marketing Calendar is priced at $29 per user/month. A free Marketing Calendar is available, but with limited features.

3. MissingLettr

MissingLettr - one of the best marketing automation software picked on this review.

Best Hootsuite alternative for bloggers, and business owners.

Supported platforms: Twitter, Meta (Pages and Groups), Instagram, LinkedIn (Personal and Company feed), and Google My Business.

Key features of This Social Media Scheduler:

  • Social media scheduling.
  • Social media calendar.
  • Share curated content.
  • Reposting.
  • Stock image library.
  • Analytics – location analytics, intelligent posting time analytics, and data into each social media account’s performance.

Another good alternative to Hootsuite is Missinglettr.

This is a great tool for busy bloggers and business owners who are looking to create an effective social media strategy.

In the dashboard, you can automatically generate snippets, images, and campaigns from your RSS feed, and then share them across your social accounts.

And how about this.

If you have a blog, Missinglettr can turn every published blog post into social media content using the ‘Drip Campaign‘.

How it does this is.

The AI behind this Hootsuite alternative will look for your best blog posts. It then determines the relevant hashtags and images to combine before posting the content to your social media accounts.

This is such a super cool way to breathe new life to all your blog posts.

And what about your new blog posts?

No worries. Missinglettr will take of it by adding your new posts to your social media calendar. Automatically.

Even if you do not have a blog post to share, ‘Missinglettr Curate’ helps you find niche-relevant posts from other users so that you can post them to your social accounts.

What I also like is the easy-to-use calendar tool.

When you use the ‘Calendar’ feature, you can review both your scheduled posts and curated content, and as well, you get a nice overview of the drip campaigns.

This helps you to create a nice balance in your campaign schedule, allowing you to make the most of your posts and avoiding unnecessary repetition of content.

And it allows you to customize and edit campaigns and curated posts from your own blog (and other bloggers’ content) – all within one platform. Easily.

Missinglettr simplifies the process of creating campaigns effectively without any fuss on your end.

Pros:

  • Very affordable.
  • The content curation tool is super handy.
  • For busy marketers and brands, the automated campaigns are very useful.

Cons:

  • The quality of the content that is generated by this tool is somewhat unreliable. You may need to revise posts (which you should always do) before you can share them on your social media platforms.
  • If you want the advanced features, you’ll have to pay more.

MissingLettr Pricing: The Starter Plan costs $9 per month, the Solo Plan costs $19 per month, and the Pro Plan costs $59 per month.

A free Marketing Calendar is available, but with limited features.

Socialpilot banner - another of the best Hootsuite alternative

Best Hootsuite alternative for small teams.

Best for: Brands and small teams.

Supported platforms: Meta, Instagram, Tik Tok, Twitter, Linked In, Youtube, Pinterest, Google Business Profile, and Tumblr.

Key features of This Alternative to Hootsuite:

  • Social media scheduling.
  • Social media calendar.
  • Bulk scheduler – you can schedule multiple posts and images
  • Content curation – this neat tool helps you to find content ideas with keyword search, create GIFs and videos, and more.
  • RSS feed automation – add your blog RSS Feed or any other blog, and Social Pilot will share automatically share on your social accounts.
  • Team and client management collaboration tool.
  • Facebook Ads.
  • App Integration with the likes of Zapier, Canva, and Dropbox.
  • Analytics – post-performance, audience insight, identify the best time to post.

SocialPilot is a robust social media scheduling tool. Along with plenty of essential features such as scheduling, messaging, analytics, social listening, and white labeling, it also offers multiple team plans.

This is handy because you can give your clients the extra helping hand they need.

As well, you can set access levels and delegate responsibilities to the people you work with.

For example, you can request that all posts submitted by content creators must be approved before they are published. Or, you can allow managers to edit and schedule posts but still have the final approval yourself.

You get a neat navigation sidebar that allows you to switch between tabs for managing posts/accounts, personalizing content from RSS feeds, accessing analytics and inboxes, and also configuring team member settings.

Also, SocialPilot allows you to manage both organic and paid social campaigns, making it an all-in-one solution for your social media marketing needs.

When it comes to managing your social content, you can post the same content to all your social channels.

Or you can create groups of social accounts and assign each post to a selected group.

Social Pilot even provides content curation. To find the most useful content for your audience, you use keywords to find the content, and when you do, you can post it, queue it, or schedule it.

So if you want a simple yet versatile tool to jumpstart your online marketing efforts then SocialPilot could be worth looking into!

Pros

  • Simple to use dashboard, making it easy to navigate.
  • The Search features make it easy to find past content.
  • Plenty of automation.

Cons

  • You have to painfully edit the same post for each channel.
  • The interface needs an update.
  • Tagging is only available for business pages.

SocialPilot Price: The Professional plan costs $30 per month, and the Small Team plan costs $50 per month.

All plans includes a 14-Day free trial.

Sendible banner - one of the best alternatives to Hootsuite

Best Hootsuite Alternative for Small Business and agency.

Supported platforms: Meta, Twitter, Instagram, LinkedIn, Google My Business, Youtube, and Pinterest, along with blogging platform, WordPress.

Key features of This Social Media Scheduler:

  • Social media scheduling.
  • Social media calendar.
  • Share curated content.
  • Queue and recycle content.
  • Keyword filtering.
  • Team and client management collaboration tool.
  • Analytics – You can identify the best times to post, your most engaged followers, and which posts perform the best so that you can create even better content. Plus, it has Google Analytics reporting.

Sendible is an intuitive and easy-to-use content calendar that helps you manage and schedule your posts.

As well, it allows users to easily schedule and publish posts individually or in bulk to social networks such as Meta, Twitter, Instagram, Youtube, LinkedIn, and Google My Business, and publishing directly to WordPress.

It even helps you upload your videos to Twitter, Meta, and YouTube.

Now that’s a big time saver.

Sendible offers a few ways to post and queue your messages on social media. From a one-time post to the big one, recycle your evergreen content.

You can even use ‘content libraries’ to store content so you can re-use it again later.

You can also customize your post for each social media.

For example, you can add hashtags to your message on Facebook, but skip Twitter.

And if you want to reach certain segments of followers by location, you can use the geo-targeting features.

One more thing here.

You can share and curate helpful content from other sources using the Content Suggestions and Content (RSS) Feeds.

And if you want to reach certain segments of your followers by location, you can use the geo-targeting features.

Now if you want to manage comments and interactions from multiple platforms, the Social Inbox allows team members to do just that.

And when you use Social listening, you can monitor competitors and key niche terms to spot trends quickly.

Just like an email inbox, when you use the Social Inbox, you can manage and respond to all your messages and activities.

Another big feature I like is the integrated Google Analytics (GA) report.

I’m a huge fan of tools that can give me data (and so should you) and having GA available on the dashboard is very, very useful.

This means you can see how much website traffic is generated from your social media postings.

And learn which social media sites are responsible for the largest amount of traffic, so you can focus your attention where it will be most effective.

Speaking of which.

With Sendible’s all-in-one dashboard , you ‘ll have access to publishing, collaboration, analytics, CRM, listening, and mobile tools at your fingertips.

That’s one powerful report.

Which makes it super handy for optimizing your campaigns further.

As you can see, Sendible is another great alternative to Hootsuite.

Pros

  • If you manage a team or an agency, this social media cross posting tool is perfect for you because of the centralized dashboard and collaboration tools.
  • Advanced posting capabilities.
  • The content calendar is very easy to use.
  • With Sendible, you can easily keep track of your brand, competitor, and key industry terms. You’ll also get email/slack notifications whenever there’s a mention that matches the criteria you’ve set.
  • You can generate detailed, custom reports and send them automatically to your clients or team members via email on a daily, weekly, or monthly basis.
  • The Sendible dashboard allows you to assign conversations and delegate messages to your team members for more efficient customer service.

Cons

  • Not all platforms are supported. Like Tik Tok.
  • The social listening feature is slow.
  • The price and organization of their plans come from the number of services you use. For example, streaming is a different service than publishing to your Facebook page.
  • When replying to conversations or mentions from Sendible, users might not see responses immediately. In some cases, this leads to repetitive responses.
  • The dashboard is clunky.

Sendible Pricing: The Creator plan costs $29 per month and the Traction plan costs $89 per month.

More plans are available for agencies and large teams.

All plans include a 14 Day free trial.

Hootsuite Alternatives – FAQ

What works better than Hootsuite?

Question banner - the best alternative to Hootsuite.

SocialBee is a great alternative to Hootsuite. It offers social media scheduling, content curation tools, analytics and reporting features, collaboration tools, and more – all at an affordable price.

Is SocialBee free?

Nope. SocialBee offers plans starting from $19 per month. Whilst Agency plans are available from $79 per month.

However, they do offer a 14 Day free trial for all plans.

What social media platforms does SocialBee support?

SocialBee supports Facebook, Twitter, Instagram, LinkedIn, Tik Tok, Google My Business, and Pinterest. Seven platforms in total.

Is Hootsuite still the best?

Hootsuite is not the best scheduler.

Although, it has been around for some time, there are other cheaper alternatives to Hootsuite and better schedulers.

Below are 5 of the best Hootsuite alternatives to seriously consider.

  1. SocialBee – the best social media scheduling tool.
  2. CoSchedule
  3. MissingLettr
  4. Social Pilot
  5. Sendible

Is there something similar to Hootsuite?

I can name 5 great alternatives for Hootsuite you will like.

  1. SocialBee – the best alternative to Hootsuite.
  2. CoSchedule
  3. MissingLettr
  4. Social Pilot
  5. Sendible

What is the best Instagram post scheduler?

SocialBee is the best Instagram post scheduler. As well, it is an awesome social media scheduling tool that supports cross-posting to platforms like Meta, Twitter, Instagram, LinkedIn, Pinterest, TikTok, YouTube, and Google Business Profile.

It has special features like content curation tools, content recycling, post previews, customizing posts for social media platforms, and more!

And the best part, it is very affordable and helps you save time.

Plus, it comes with a 14-day free trial.

Speaking of which. Socialbee is one of the best alternatives to Hootsuite.

Which Hootsuite alternative is best for small business?

SocialBee is a great social media tool for small businesses.

It costs less than other social media tools, like Hootsuite.

You can save time by using the re-queue feature to post different types of content at once and if you want to, recycle evergreen content. Which comes in handy.

Plus, you can use it to research your competitors’ followers on Twitter and tap into the them!

SocialBee also has lots of reporting and analytics features, so it’s perfect for larger teams too.

Overall, this is my top pick for the best Hootsuite alternative for small business.

Summary of The Best Hootsuite Alternatives For Your Business

Best Hootsuite alternatives banner post.

There you have it, 5 of the best Hootsuite alternatives in 2025.

And if you’re wondering which the best alternative to Hootsuite is for you?

It really depends on your needs, goals, and how often you use various social platforms.

For one, there is no social media scheduler out there that will be perfect. There never will be.

If there’s one, I’ll jump into an Uber taxi, and then shout “follow that car!”

However, if you’re looking for a versatile solution that can help schedule your content and manage campaigns, you can’t go wrong with this pick:

SocialBee – This social media cross posting tool is by far the best alternative to Hootsuite as it will help save time and keep you organized with your content.

For example.

You can file each of your posts under a category and then post it across platforms by categories rather than publishing posts one at a time.

As well, you can re-queue and edit your posts in bulk. Nice.

Lastly, you can recycle your evergreen content for more organic reach. This is a must-have.

And the best thing is – it is truly affordable. The Bootstrap plan starts at $19 per month!

If you’re a solopreneur, blogger, or small business, SocialBee is worth a serious look. This is the best Hootsuite alternative.

You Might Want to Check This Out Too

Disclosure: This post may contain affiliate links, which means I’ll receive a commission if you purchase through my links, at no extra cost to you. Please read full disclosure for more information.

Resources To Grow Your Business With

Bluehost

Bluehost is a great starting point for beginners or bloggers who want to switch to a reliable web hosting service. And it gives you the best bang for your buck – starting at $2.95 a month*.

With the entry-level hosting plan, you’ll get a free domain name for one year, free SSL, free CDN, reliable customer support, and 30 day money back guarantee.

You can sign up with Bluehost here.

WPX Hosting

It’s a web-hosting service I love using.  It specializes in WordPress hosting, and depending on what package you opt for, you can host 5 or more sites on one account. The best bit is – the quick turnaround in support is top notch.

For bloggers who have an established blog, this is a fantastic option.

You can learn more about this service here.

Aweber

Building an email list of a growing audience is essential for the longevity of any business.  This autoresponder service is easy to use, and it is a great starting point for someone looking to kickstart their email campaign. You can try their free account here.

How to Start a WordPress Blog on Bluehost -No Coding Skills 2025

How to Start a WordPress Blog on Bluehost -No Coding Skills 2025

How to Start a WordPress Blog on Bluehost -No Coding Skills 2025

Thinking about starting a blog but don’t know where to start?

You’re in the right place! In this post, we’ll show you how to start a WordPress blog on Bluehost in 7 simple steps.

Even if you have zero coding skills and zero blogging experience.

Once your blog is ready, you can start publishing killer-ass content and build an online audience.

And once you have an audience, you can start making money from your blog. It’s a great way to share your thoughts and ideas with the world – and make some money while you’re at it.

So follow these steps to get your WordPress blog on Bluehost today!

Because if you are a rookie blogger, you will learn how to start a blog with Bluehost, how to get a FREE domain name, and how to publish your first of many epic posts.

(Real quick. If you want to know how to start a movie blog or even know how to start a knitting blog, this step-by-step guide. Will. Show. You. How.)

But first, before I reveal the steps on how to start a blog on Bluehost.

Why Bluehost Is The Best For Blogs?

A blog post on how to start a wordpress blog on bluehost

This page have some affiliate links. In other words, if you buy from my links, I may get a commission.

Bluehost is a great platform for beginners looking to create a website, whether you’re a blogger or an entrepreneur getting started.

They have great customer support and an easy-to-use control panel. This makes it easy for you to get your website up and running in no time.

Other notable features of Bluehost website builder:

  • A free domain name for the first 12 months.
  • Their hosting plans are inexpensive. For less than $3 a month.
  • It’s free and super easy to start a WordPress blog on Bluehost.
  • No silly hidden fees.
  • WordPress even recommends using WordPress with Bluehost blog.
  • Create free custom email addresses with your domain names like [email protected]
  • Friendly 24/7 support.
  • Free SSL certificate.
  • 30-day money-back guarantee. This means if within 30 days you are not happy with Bluehost, you can ask for a refund on the hosting plan (minus the domain registration fee).

Over the many years of blogging, I have tried a few hosting providers and Bluehost stands out with its easy and quick setup.

On that note.

If you plan to use Bluehost with WordPress and you want to know how to start a blog with Bluehost, let’s continue to geek out.

How much does it cost to start a blog on Bluehost?

Bluehost WordPress hosting plans

There are four plans available from Bluehost.

  • BASIC – $1.99/month*
  • CHOICE PLUS – $3.99/month*
  • ONLINE STORE – $7.45/month*
  • PRO – $9.99/month*

Note that, all plans above include a FREE Domain (1 year), FREE CDN, and FREE SSL Certificate.

How to start a wordpress blog on Bluehost - plan features

The bottom line – Bluehost is one reliable blog host. They offer great customer support and super easy WordPress Installation. Plus, their plans are inexpensive.

Just look at it this way. For $1.99 a month, which is like having one cup of black coffee a month, you can have a blog up in no time.

Interested? All you need to do is sign up for a BASIC plan here, and you’ll have your Bluehost blog running.

In a nutshell. This is essentially how to start a WordPress blog with Bluehost.

With that out of the way, let’s go through the steps on how to use Bluehost with WordPress in more detail.

What Do I Need to Start a WordPress Blog?

Before you start a blog, you will need three things: blog hosting, a domain name, and the WordPress blogging platform.

If you’re not too sure what these things are, I’ve got you covered. So scroll on down.

1. What is blog hosting?

What is blog hosting. A post about how to start a WordPress Blog on Bluehost.

Image courtesy of Pexels

For those who are new to blogging, blog hosting is a great way to get your blog online and visible to the world.

It allows you to create and manage a blog easily, without having to worry about complicated technical details.

Basically, blog hosting is like renting space on an existing server so that you don’t have to manage one yourself.

Think of it as renting a room in someone else’s apartment.

You’re not buying or maintaining the property, but using the services it provides while living there.

To give blog hosting a real-life example, let’s say you’re interested in starting a WordPress blog about interior design.

With blog hosting, you can use a provider (I recommend Bluehost) who will give you the space and resources needed to kickstart your blog and make sure it runs smoothly.

In other words, a hosting provider acts as the landlord of your virtual space.

What to look for in a web hosting provider?

As a blogger, I want reliability and a fast-loading website.

As a website visitor, I want a website that loads fast and gives me what I want.

When looking for a reliable blog hosting provider, there are certain features and services to keep in mind.

Firstly, look for a host with good uptime and fast loading speeds.

Fast loading speeds are essential for a successful blog.

So, if your website loads slowly, it cannot only turn away potential visitors and customers but also negatively affect how high you appear in search engine rankings.

Search engines like Google prioritize websites that load quickly and efficiently, as this is an indicator of how trustworthy the website’s content is.

You also want to make sure the hosting plan you choose includes features like automated backups, secure encryption, and more.

All these features provide an extra layer of security for your blog, so it’s important to consider how reliable the host is before making a decision.

As well, a reliable host should offer high-quality hardware and servers to ensure your blog is always available and accessible to visitors.

Secondly, the hosting company should offer easy installation of popular blogging platforms, such as WordPress.

Finally, look for a host that offers plenty of customer support and helpful tutorials on how to get the most out of your blog.

I’ll put my hand up again and say.

I recommend Bluehost for blogging beginners because it is reliable, provides fast loading speed, and is affordable.

2. What is a domain name?

A domain name is how your blog will be found on the internet.

It’s like an address for your website – when someone types in your domain, they will be taken to your blog.

To put it simply, if you were renting a room in an apartment, you’ll have a residential address where people can find you.

So choose a domain name that reflects the content of your blog, and your brand and is easy to remember.

3. What is WordPress?

A girl thinking what is WordPress. A paragraph about Bluehost blogging.

Image courtesy of Pexels

Fun fact: according to W3Techs, WordPress is the most preferred CMS used by 63.6% of websites surveyed. This is huge.

WordPress is a content management system (CMS) specifically designed for blogging.

Once you have blog hosting and a domain name, you can install WordPress on your Bluehost account with just one click.

From there, you’ll be able to customize your blog and begin writing posts to help your readers.

Now that you know what you need to get started, it’s time to start your blog on Bluehost!

If you’re ready to start. Let’s get onto the 7 easy steps on how to start a WordPress blog on Bluehost.

Bluehost WordPress Tutorial: How to Start a Blog on Bluehost

Teacher tutoring a subject on Bluehost WordPress Tutorial.

Image courtesy of Pexels

This Bluehost WordPress tutorial is a big read, but I tried to keep it simple. I swear it is.

So, if you seriously want to know how to install WordPress on Bluehost, then stick around.

(I’m assuming here, you’ve dialed in on your money-making topic and have lasered in on your ideal audience. For more on this check out this post on starting a blog checklist.)

1. Choose a Bluehost Plan.

The first step is to choose the right plan for your needs and budget here.

Then click on the ‘View Plans‘ button.

Bluehost offers four different plans – BasicChoice Plus, Online Store and Pro – each of which comes with different features and pricing.

If you’re just starting and don’t have a lot of traffic yet, the basic plan is the best choice.

It comes with 10GB of storage space so it should be sufficient to get your blog off the ground.

Here’s a secret. I’m tight with my expenses, so I like to start small.

As you can guess.

The basic plan was my obvious choice for a new blog because it had zero traffic at the time and it had the tools I needed to start my Bluehost blogging business.

And the nice thing was.

If the blog didn’t work out, it was a small loss in terms of money.

But, if the blog started generating traffic, I had the option to level up my hosting plan with Bluehost.

Although I had to pay for the web hosting to get my blog up and running, I saw it as an investment to build a Bluehost blog that could potentially make my money back and more.

Blogging after all is not a hobby. It’s a business.

2. Got a name?

Once you’ve chosen a plan, the next step is to register your domain name.

You can either choose an existing domain name or create a new one with Bluehost.

At this point here, I suggest having at least 3 domain names on hand as there may be a chance that your first preference may be taken.

If you don’t have a domain name, you can skip this step by clicking “I’ll create my domain later”.

If you have your ideal domain name for your Bluehost WordPress blog, then registering it is free and effortless – just go to “Create a new domain”:

Then type the domain name in the box and click “Next“.

If it isn’t available, try another domain name – or you have the choice to decide later when you have your hosting set up.

To do that, click on “I’ll create my domain later”.

If you remain on the page or hover your mouse near the top, a popup will appear with an option to click “Choose Free Domain Later”.

Once you’ve chosen a domain name or decided to do so later, the final step in your signup is to set up hosting for your WordPress blog.

A pin on how to start a WordPress blog on Bluehost

3. Let’s play.

Here. The fun part begins.

And don’t worry. It’s straightforward.

To set up Bluehost hosting for a blog, first fill in your account information.

Use an email address you check often because this is how you’ll get the login details.

Second, pick how long you want the hosting plan to last. I suggest going for the cheapest plan, the Basic plan because it is all you need for a new Bluehost blog.

For rookie bloggers, I recommend the 12-month plan as it is a great starting point for beginners and super affordable.

Ok. That being said, once you’ve picked a plan, you’ll be taken to this page to register a domain for your Bluehost blog.

A Bluehost WordPress tutorial on choosing a domain name.

If you have picked a domain name, then ‘Create a new  domain’.

If you don’t have one, then click on ‘I’ll create my domain later’.

And then fill in the rest below.

A Bluehost WordPress Tutorial on choosing and signing up on the registration page.

Note here that when you register for 12 months or longer, you’ll get a free domain name. More savings!

Moving on. Once you’ve entered all the details, the next step is this.

The extras page on Bluehost.  A Bluehost WordPress Tutorial on starting a blog.

Thirdly, choose any extra services if you think they are helpful. But, don’t buy something you’re not sure what it is for.

However, I suggest skipping those ‘extras‘. That’s just my two cents.

But, I’ll leave that decision to you.

For more details on those ‘Package Extras‘, click on ‘More Information‘.

Finally, enter your payment details and follow the instructions to complete the launch your Bluehost website builder.

How to start a WordPress blog on Buehost demo of payment page .

And when you have, this pops up.

A welcome message and you can start a blue host blog soon.

Now onto the next step on how to build a WordPress website with Bluehost.

4. Drum roll.

This is the easiest and the most exciting part. Installing WordPress on your hosting account.

Once your payment has been processed, you should receive a welcome message from Bluehost.

Bluehost WordPress tutorial advise on the welcome page from Bluehost.

First, create your password and make it a complicated one.

And you’re done. You now have a Bluehost WordPress blog ready to be unleashed.

5. Get your look.

Once WordPress is installed, it’s time to customize how your blog looks. You can do this by choosing a free theme from the library of available options or creating one of your own.

However, do note that the free themes on offer are less customizable. So, if you want a more flexible theme, a paid theme is the best option.

How to start a WordPress blog on Buehost demo of free themes.

Once WordPress is installed, it’s time to customize how your blog looks. You can do this by choosing a free theme from the library of available options or creating one of your own.

However, do note that the free themes on offer are less customizable. So, if you want a more flexible theme, a paid theme is the best option.

A paid theme that I use and recommend is Elegant themes. It’s customizable and easy to use, and there are many awesome responsive themes you can choose from.

Now, if you are unsure which theme to go with, you can always skip this step and come back to it later.

You can also add plugins to your blog to add features like contact forms, cache, and more. (More on this later in the post.)

There you have it. You now have a Bluehost WordPress blog ready to go.

Now, that’s how to start a WordPress blog on Bluehost!

Moving on.

6. Time for the inner sanctum.

Why start a blog? You get good at marketing!

Image courtesy of Pexels

Once you have chosen a theme (or decided to skip it for later), you’re directed to your Bluehost account dashboard.

In the dashboard, you have control over your websites, domains, plugins, and other settings.

In fact, in the center of your dashboard, you’ll be able to see your WordPress blog.

To access your Bluehost WordPress blog, click the button – “Login to WordPress”.

Bluehost WordPress Tutorial about the login page.

And that’s it. You’ve more or less have all the technical Bluehost WordPress Blog stuff done and dusted.

I hope you’re excited because here is where you can do all kinds of things to fancy up your blog, and more importantly, load your blog with useful content.

Another naughty secret. I’m lazy when it comes to fancy logos and colors. You can say that I’m simple.

And I like to keep it simple because I prefer to get on with creating epic content and generating traffic to it.

The bottom line in all this is.

Don’t get too carried away with all the fancy stuff because it can be a huge time suck. You can always fancy up your Bluehost WordPress blog later.

Ok?

If you want to know how to start a blog on Bluehost successfully, you need to be planning and creating useful content consistently so you can connect with your readers and then turn the traffic into sales.

Now, back to this part of the Bluehost WordPress tutorial.

When you log into your WordPress dashboard, you’ll be prompted to set up your blog. You will need to provide your website’s name, description, and a few other details.

A quick mention.

A hand on the glass. Part of the tutorial on how to start a blog on Bluehost.

Image courtesy of Pexels

Another way to log in is to enter your domain name followed by “/wp-admin” into any web browser. Then type in your username and password which you will find in an email from Bluehost. Once you are logged in,

For example, if your domain is “myurl.com”, enter this URL – https://myurl.com/wp-admin.

Then hit your Enter button, where you’ll be directed to your login page.

To access the dashboard, enter your username and password details to log in.

Again. Don’t fret if you can’t recall the WordPress blog username and password because you will have received an email from Bluehost about your login credentials to get started.

Moving on.

When you log in to the admin area of your dashboard, you can start customizing your blog, creating posts, and pages, or adding media like images and videos.

But before you do, you’ll notice the WordPress admin area has a menu on the left side with key features.

You can use it to write posts, upload photos, and videos, make pages like Contact or About Me page, view comments from readers, and change how your website looks.

Some plugins help you add new features like contact forms and security tools.

Wordpress navigation menu. A tip on how to build a website on Bluehost.

Here’s a quick breakdown.

  • Posts: Here you can draft, polish, read, and oversee your blog posts.
  • Media: You can upload and organize your images and videos that can be used in your blog posts or web pages.
  • Pages: Design and personalize your pages like a Contact or About Me page to reflect who you are!
  • Comments: Encourage an engaging dialogue on your blog by viewing, approving, and managing feedback from readers!
  • Appearance: Easily customize the appearance of your Bluehost WordPress blog by searching for, installing, and configuring new WordPress themes. I recommend Elegant Themes.
  • Plugins: Plugins can bring a wide array of fresh features to your blog, including contact forms, SEO-enhancing tools, and security and backup options – among many other useful additions! (More on this next).

About WordPress Plugins

Let's see howhow to start a blog on Bluehost using plugins

WordPress plugins are powerful additions that you can quickly and easily install onto your WordPress dashboard, giving it a whole new set of features to enhance the user experience.

Before you begin enhancing your WordPress website with plugins, there are a few things to consider.

For example, having too many plugins can slow down your site and frustrate your readers.

Therefore, it’s important to maintain the number of plugins you use at a minimum for optimal performance.

Additionally, keep in mind that anyone can develop and publish a plugin to the WordPress library.

This means the quality will vary.

While some plugins have been designed by large cohorts of experienced coders, others are the work of lone hobbyists.

Hence, if you are new to WordPress, it is wise to pay close attention to the rankings and reviews for any plugin that you plan on using.

For my best picks, you can read this blog post using the best WordPress plugins for your Bluehost blogging.

Four more things to pay attention to.

4 plugin things about using WordPress with Bluehost.

1. For optimal performance, limit yourself to the necessary plugins.

Bloggers are often tempted to install plugins since they’re so straightforward, even if it is just for the sake of having them. Avoid this mistake.

2. Keep your plugins tidy and organized by regularly performing maintenance checks.

Once a month, go through your list of installed plugins. Remove any plugins you do not need.

3. Keeping your plugins up-to-date is essential for protecting your website – make sure to check them weekly.

4. Don’t take any risks – safeguard your website by backing up all of its data before you update. Plugin updates may sometimes spell trouble for your blog, so be mindful when making changes.

To ensure your website is protected before making any changes, use a free plugin such as UpdraftPlus for hassle-free backup creation.

Doing so will provide you with peace of mind knowing that all the data from your WordPress website has been securely saved and stored.

How to search and install WordPress plugins

How does Bluehost work with WordPress plugins

In your WordPress dashboard, you can explore and install plugins with ease. Searching for the ideal plugin has never been simpler! Navigate to Plugins > Add New to get cracking.

Using the WordPress Plugin Directory, you can easily find a particular plugin by typing in a keyword.

To install any plugin you wish, simply type its name into the search field on the right.

Once you’ve located the plugin of your choice, click on “Install Now” to install it promptly. While the plugin is being installed, do not leave the page.

After the installation process is complete, click on “Activate” to unlock all of the features that your plugin has to offer!

Side note: Do not enable auto-updates for your plugins and think twice before updating them right away. Now and again, new plugin updates bring along some pesky bugs, which are typically resolved within a few weeks.

To manage all the plugins on your WordPress blog, simply go to Plugins > Installed Plugins in the left-hand side menu. It’s that easy!

And that’s how you create a WordPress blog on Bluehost!

As you can see, setting up a blog is easy and doesn’t take very long. You can now start writing your best posts and sharing them with your readers, which I’ll cover next.

So let’s move on to the last step.

7. It’s showtime.

It's showtime. Time to have a Bluehost website builder.

Now that you have set up a WordPress blog on Bluehost, it’s time to crank out your first post.

And as it is your first post, just keep it short and sweet. There’s no need for a post to be long or complicated.

As a newbie blogger, why not kick off your journey by introducing yourself to the world? Let’s hear it – who are you and what do you have to share with your readers?

Sharing why you started this blogging journey, as well as what you hope to accomplish with it, will help readers understand the focus of the content — making for an effective opening article!

Just be you and allows readers into your world.

How to start a blog post on Bluehost

how to start a wordpress blog on bluehost demo on Bluehost dashboard page.

1. To write a blog post, open the WordPress admin area and click on “Posts” in the left-hand menu. From there select “Add New” to open up the post editor.

By the way, before you start blogging away, be sure to check the best practices for blogging here.

how to build a wordpress website with bluehost using the post tab.

2. The headline of your blog post is the H1, or chief heading, for your entire article. Make sure you create an attention-grabbing title so that readers want to dive in and learn more! In other words, your blog post title is the most important heading.

3. You can then write your post in the text editor. Just type in the field or paste content from another source – like a Word document, Google Doc, etc.

4. Keep in mind to shorten your sentences and paragraphs so that it is both easy to read and engaging.

5. Add Headings (H2, H3, H4) within your body text as they help separate text into more manageable chunks. Headings can be used strategically to create a sense of structure within your blog post.

6. Tip: If you want to emphasize the importance of multiple sections on your website, consider utilizing H2 elements.

This will help ensure that each section is given equal attention and visibility. And, if you want to organize your H2 blocks further, employing H3 and H4 headings can be incredibly helpful in segmenting and breaking up large chunks of text.

7. Style your paragraphs and test using bold (B) and italics (I) to emphasize a word or sentence.

8. To add images and other media to your posts, click on the “Add Media” button at the top of the post editor to select and upload files. I recommend adding at least 3 to 5 images to break up the text.

9. Label your images using keywords. To do this, right-click on the image and then enter your keywords into the image file. For example, instead of “213445456.jpg”, change it using a keyword, like “how to start a WordPress Blog on Bluehost.jpg“.

10. Don’t be afraid to experiment with the various formatting tools available; even if something doesn’t go as planned, it’s okay! Because you have the freedom to customize your content by either adding or deleting text blocks as needed.

11. To keep your readers engaged longer on your website, add internal links to your blog post.

12. Give your readers a valuable resource by including external links in your blog posts.

By drawing attention to high-quality websites, you’re building credibility while providing helpful information!

When you’re finished writing your first blog post, click on “Publish” at the top right of the post editor.

But if you prefer a post to be published later, you can schedule it by clicking on Immediately and then selecting a date and time.

how to start a blog with bluehost demo on scheduling a blog post.

And that completes our Bluehost WordPress tutorial! You’ve now learned how to start a WordPress blog on Bluehost in 7 steps.

With the tools and resources provided, blogging is now within your reach.

So, go ahead and get creative – the sky’s the limit! And happy blogging!

How to Start a WordPress blog on Bluehost – FAQ

Is Bluehost good for blogging?

Blogging can seem intimidating and confusing to those just starting – after all, there are a lot of technical aspects you have to consider!

Fortunately, Bluehost is the perfect place for beginner bloggers. It provides an easy-to-use interface that simplifies setting up your blog, as well as an intuitive signup process.

Plus, if you’re just getting started in the blogging world, you’ll be pleased to know that you’ll receive a free domain name for your first 12 months – giving you great value at an unbeatable price.

And to top it off, Bluehost is recommended by WordPress themselves – the most popular blogging software used worldwide!

So if you’re on the hunt for a blog hosting provider to start your blog, Bluehost should be on your radar.

Is Bluehost good for beginners?

Is Bluehost good for beginners banner.

If you’re a blogging beginner, look no further than Bluehost for the best start to your website.

They make it incredibly easy and fast to launch a fully-functioning blog with WordPress, so all the basics you need are set up with minimal fuss.

And they can do it on a budget too – their plans start at just $2.95 per month.

Not only that, but they have 24/7 live chat support on hand if you run into trouble, and they even throw in a free domain name for the first year and a free SSL certificate!

It doesn’t get much better than this when it comes to setting up your website.

Psst. If you want to know how to build a WordPress website with Bluehost, continue reading.

How to use Bluehost with WordPress?

Seriously. Starting a WordPress blog on Bluehost is quite simple.

All you need is the domain name of your choice and a few clicks away, you’ll have a Bluehost blogging business!

This is how to use Bluehost and WordPress in 5 steps.

1. Choose Your Domain Name:

The first step in creating your WordPress blog is to choose a domain name.

A domain name is how people will find and access your website, so you must pick one that you like and that is easy to remember.

2. Choose Your Hosting Plan: Once you have chosen a domain name, the next step is to choose a hosting plan.

Bluehost has a variety of hosting plans to choose from, so you can select the one that best fits your needs and budget.

And remember, when you sign up with Bluehost, you’ll get a FREE Domain (for 1 year), FREE CDN, and a FREE SSL Certificate.

3. Install WordPress: Now that you have chosen a domain name and hosting plan, it’s time to install WordPress on your server.

Installing WordPress is easy with Bluehost. All you have to do is click a few buttons and you’ll be ready to go in no time.

4. Design Your Blog: The next step is to design your blog. With WordPress, you can choose from thousands of different themes and plugins that allow you to customize your blog the way you want it.

You can also add widgets and other features to make your blog truly unique.

If you’re considering a premium template, I recommend Elegant themes.

5. Start Blogging: Once you have designed your blog, it’s time to start blogging! Write about topics that will be helpful for your readers, post pictures and videos, and interact with your readers. There are endless possibilities for how you can use your WordPress blog on Bluehost.

And that’s how to start a blog with Bluehost and WordPress.

How does Bluehost work with WordPress?

Bluehost works with WordPress in several ways.

First, it provides an intuitive dashboard that makes setting up your WordPress blog quick and easy. Plus, when you sign up for Bluehost, you’ll get a free domain name for the first 12 months!

In addition to this, Bluehost also provides an optimized hosting environment for WordPress websites only. This means that your blog will run more smoothly and with fewer technical issues.

Finally, Bluehost also provides a free SSL certificate for your blog. An SSL certificate is important for establishing trust with your users, and it’s something that many other hosting providers don’t offer.

So if you’re looking for an easy way to start a WordPress blog on Bluehost, be sure to check out all the features they have to offer.

With their powerful hosting environment and easy-to-use dashboard, it makes setting up your website quick and simple!

How much does Bluehost cost per year?

When you sign up for a BASIC plan with Bluehost for 12 months, you’re looking at $2.95 a month. This includes a FREE Domain (1 year), a FREE SSL certificate, and a WordPress blog on Bluehost.

For other Bluehost plans, click on the button below.

How to start a WordPress blog on Bluehost in 2025 – Summary

Using Bluehost with WordPress is an easy and affordable process to get your website up and running.

It’s the perfect choice for blogging beginners, as the plans start at just $2.95 per month and include a free domain name for your first 12 months, as well as 24/7 live chat support.

Bluehost also makes it incredibly easy to install WordPress, with just a few clicks of your mouse.

Once you have chosen your domain name and hosting plan, simply follow the steps outlined in this article to design and customize your blog with themes and plugins before you can start blogging!

And remember, when you post, put your audience first and post the best ever content you can.

With Bluehost, anyone can get started on their own website journey.

Now that you know how to start a WordPress blog on Bluehost, start here now and give it your all to make it work.

While you’re here.

If you have any feedback and thoughts about this long Bluehost WordPress tutorial, I’d love to hear them. And if there is anything you need help with, let me know.

One more thing. Please feel free to share this post ‘How to Start a WordPress Blog on Bluehost’ with others who may find this post useful! Thanks!

Disclosure: This post may contain affiliate links, which means I’ll receive a commission if you purchase through my links, at no extra cost to you. Please read full disclosure for more information.

You Might Want to Check This Out Too

How to Start Blogging And Make Money Online? – Here’s 15 ways bloggers can monetize their blog.

Want to drive red hot leads to your blog?  – 11 easy ways to promote your blog without the need for social.

Resources To Grow Your Business With

Bluehost

Bluehost is a great starting point for beginners or bloggers who want to switch to a reliable web hosting service. And it gives you the best bang for your buck - starting at $2.95 a month*.

With the entry-level hosting plan, you'll get a high up-time, reliable customer support, FREE domain name (first year) and 30 day money back guarantee.

You can sign up with Bluehost here.

WPX Hosting

It's a web-hosting service I love using.  It specializes in WordPress hosting, and depending on what package you opt for, you can host 5 or more sites on one account. The best bit is - the quick turnaround in support is top notch.

For bloggers who have an established blog, this is a fantastic option.

You can learn more about this service here.

Aweber

Building an email list of a growing audience is essential for the longevity of any business.  This autoresponder service is easy to use, and it is a great starting point for someone looking to kickstart their email campaign.

You can try their free account here.

Pin It on Pinterest